You've got one finished video, and suddenly it needs to live three different lives. The YouTube version stays wide, the Instagram feed post needs a tighter frame, and the Shorts upload has to go vertical without chopping off the singer's face or half the lyrics. That's where most aspect-ratio advice falls apart. It treats the job like a resize button problem when it's really a framing problem.
For karaoke and lyric videos, the need for precision is higher than it looks. A cinematic crop that works for a talking-head clip can destroy a lyric line, trim a logo, or push subtitles into the edge where the platform UI covers them. If you're trying to learn how to change aspect ratio of video without cropping the important parts, start by thinking like an editor, not like a converter.
What Aspect Ratio Actually Means for Your Video
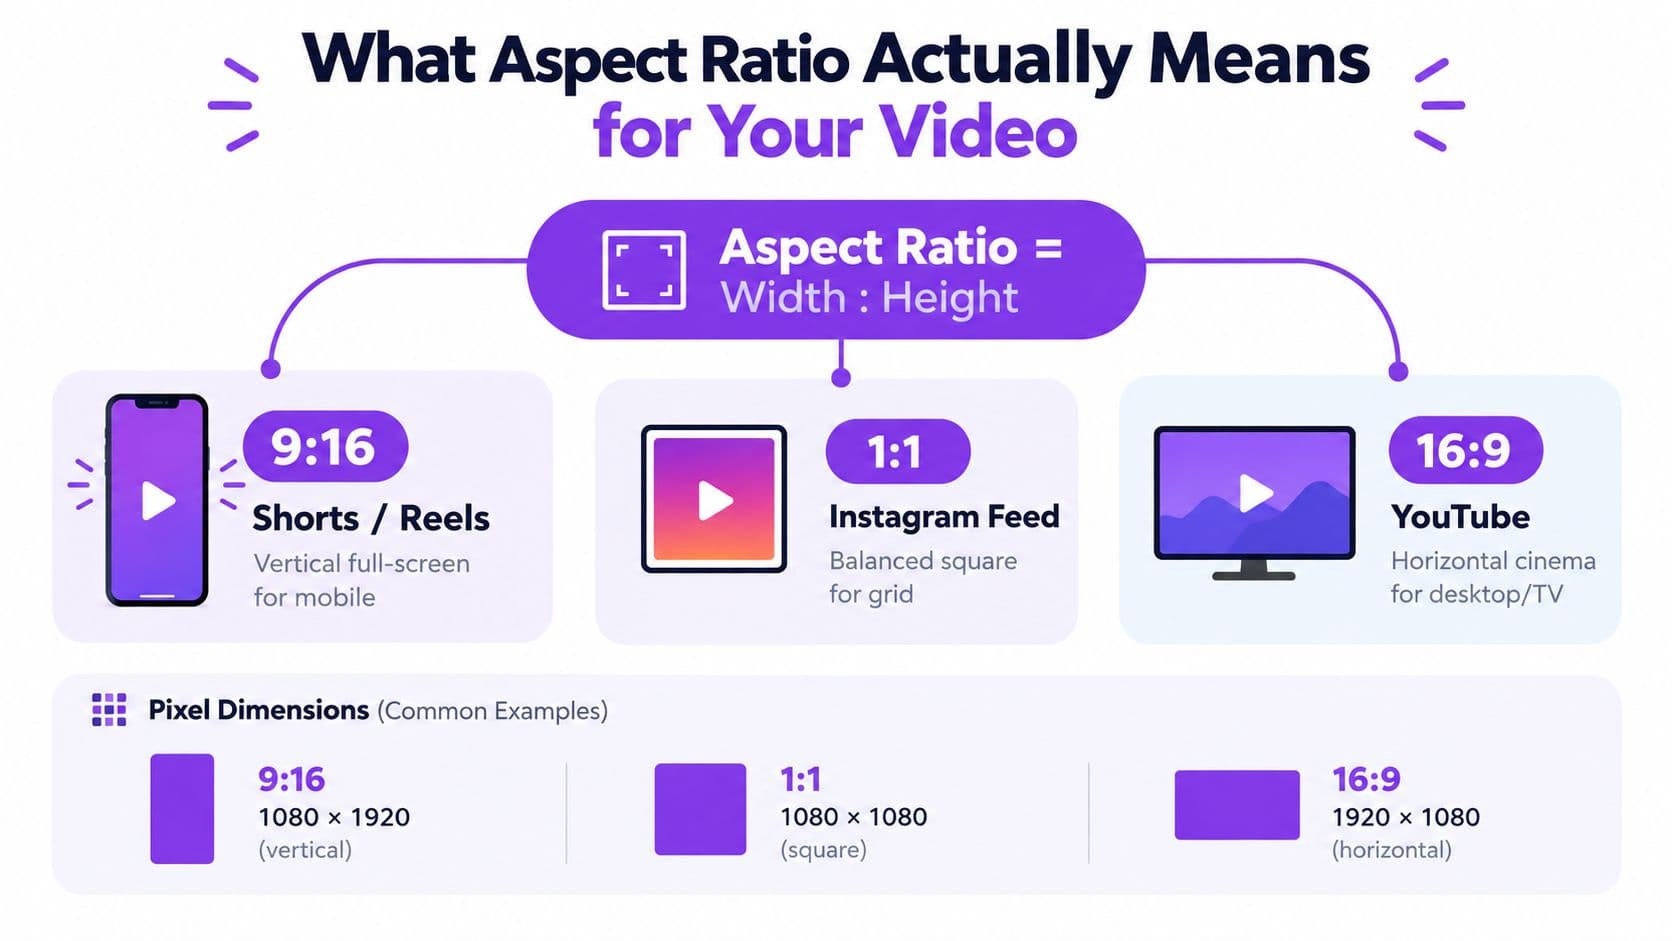
If you repurpose the same master across platforms, you're not really making “different videos.” You're rebuilding the same composition inside different frame shapes. That's the practical meaning of aspect ratio. It's the relationship between a video's width and height.
A few examples make it simple:
- 1920×1080 is 16:9
- 1080×1920 is 9:16
- 1080×1080 is 1:1
Those numbers confuse people because resolution and aspect ratio aren't the same thing. Resolution is the pixel dimensions. Aspect ratio is the shape. A video can stay 16:9 whether it's exported small or large, because the frame shape hasn't changed.
Why the shape matters so much now
Modern video workflows inherited their ratio standards from older display systems. Silent-era cinema commonly used 4:3 (1.33:1), then the Academy standardized 1.375:1 in 1932 to account for the optical soundtrack strip. Standard-definition television kept the 4:3 shape, and the HDTV shift later introduced 16:9 (1.78:1) as a practical widescreen compromise for broadcast and cinema distribution, which is why 16:9 still dominates HD and online delivery today, as explained in RED's overview of video aspect ratio history.
That history still shows up in every export preset you click.
DAR, SAR, and why FFmpeg gets weird
When a file looks wrong after export, beginners often think the crop failed. Sometimes the problem is the file's metadata. Display aspect ratio (DAR) is how the video should appear on screen. Storage aspect ratio (SAR), often tied to pixel shape, affects how the file is interpreted.
Practical rule: If a video looks stretched even though your math was correct, check whether the file is carrying an aspect flag you didn't intend.
This matters more in command-line workflows and with older source files. Anamorphic settings can make a file report one shape while displaying another. That's one reason clean aspect-ratio work starts before export, at the composition level.
For karaoke, safe zones come first
Most tutorials stop at presets like square, widescreen, and vertical. That's not enough for lyric work. Recent guidance has pushed the idea of an aspect-ratio method built around a centered safe zone because the edges are the first parts to disappear when you batch-crop across platforms. That problem is especially sharp for caption-heavy content like karaoke and lyric videos, where text near the frame edge is easy to lose, as noted in this guide to social media video aspect ratio safe zones.
If your captions, faces, logos, or product shots can't be clipped, then aspect ratio isn't a resize setting. It's a composition decision.
When to Crop, Pad, or Rescale
Before opening Premiere, HandBrake, or anything else, make one decision: what absolutely must remain visible? Once you answer that, the method usually picks itself.
Crop when the edges don't matter
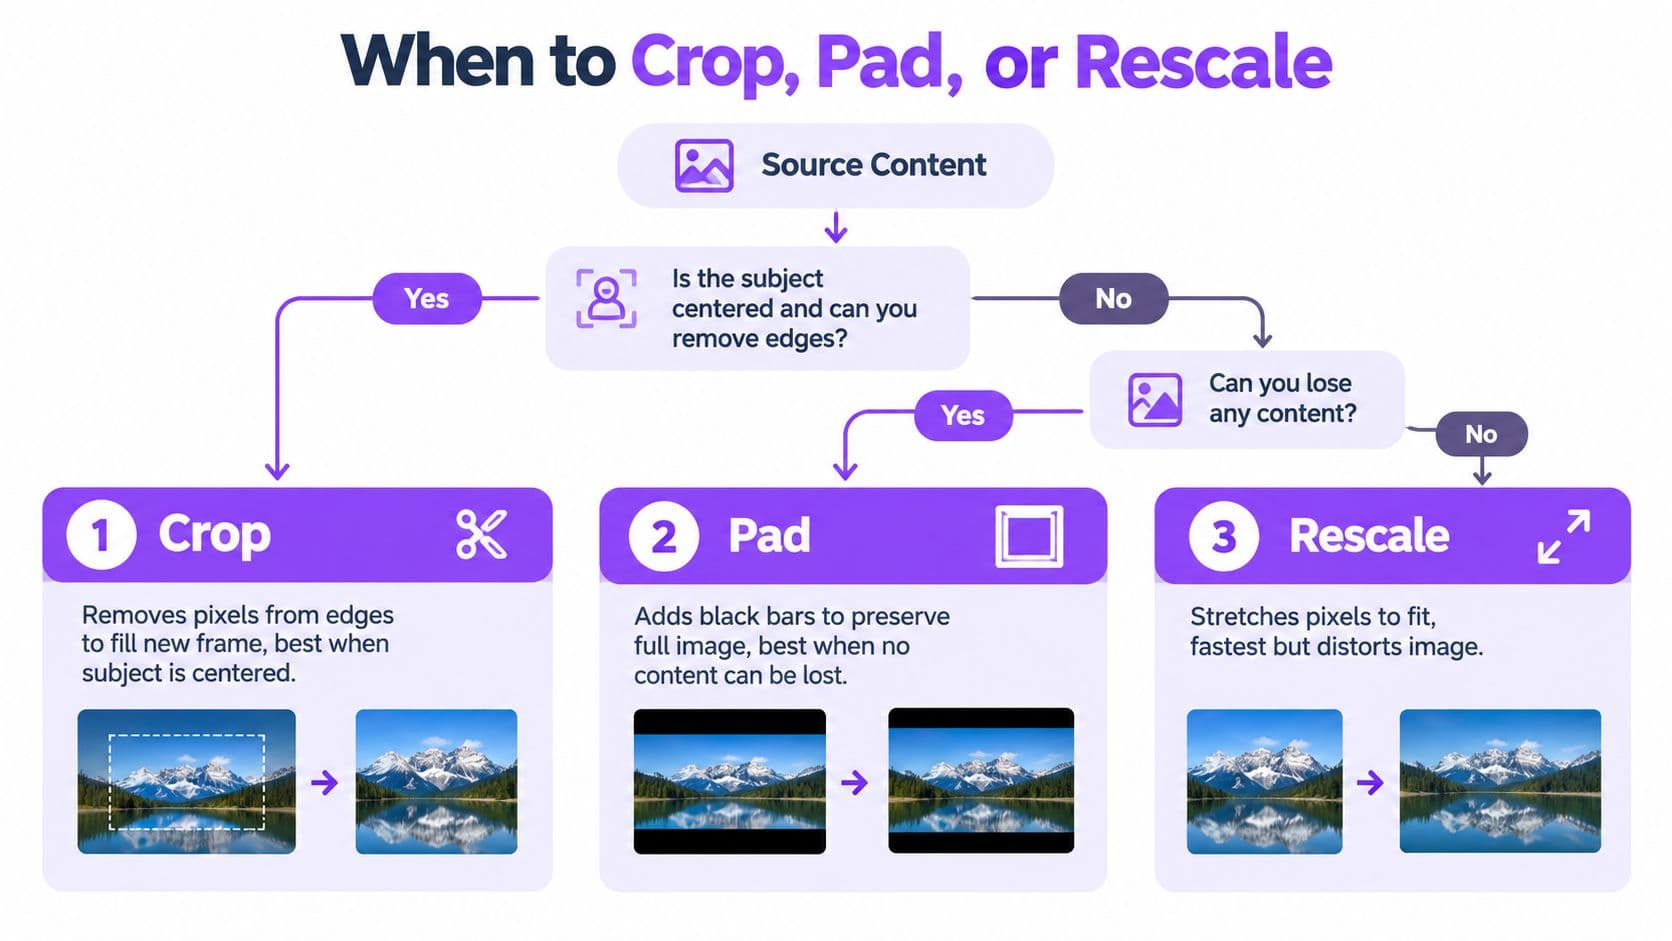
Cropping removes part of the frame so the remaining image fills the new shape. It works when your subject is centered and the sides are dead space, background blur, or visual clutter.
Good candidates for cropping:
- Centered performance shots where the singer stays near the middle
- Simple lyric layouts with generous margins
- Product clips where the item sits well inside the frame
Bad candidates are easy to spot too. If the lyric line runs wide, the duet layout uses both sides, or the logo sits close to the edge, crop is usually the wrong first move.
Pad when nothing can be lost
Padding adds bars around the video to fit a new frame without cutting the source. In wide-to-tall conversions, that often means empty space above and below or on the sides, depending on the destination.
For karaoke, padding is often the safest answer because every word stays visible.
- Best use case is lyric videos with tight text margins
- Trade-off is smaller on-screen text inside the finished frame
- Helpful variation is replacing plain black bars with branded color, blur, or background art
If a single missing word breaks the video, preserve the full frame first and worry about aesthetics second.
A lot of creators resist padding because it doesn't “fill” the screen. Under deadline pressure, that's still better than a polished export with clipped captions. Teams handling many channels also care about workflow speed, and that's where systems for publishing matter as much as editing. If you're juggling outputs across several accounts, this guide on Donivo efficiency for creators is useful context for keeping the delivery side organized.
Rescale only when distortion is acceptable
Rescaling in the wrong sense means stretching or squashing the whole image to force it into a new shape. That's the classic “everyone looks thinner” or “why is the logo warped” mistake.
Avoid it in almost every final deliverable.
There are only a few times I'll tolerate it:
- Internal review copies where speed matters more than appearance
- Temporary placeholders for layout approval
- Background-only elements where distortion won't be noticed
A fast decision rule
Use this quick check before you touch the timeline:
- First, mark faces, lyric lines, lower thirds, logos, and any subtitles.
- Next, identify the outer edges that can disappear without damage.
- Then, choose the method that sacrifices the least important area.
If the frame can lose edges, crop. If it can't lose content, pad. If the clip must be reframed dynamically, use motion tracking or keyframed position changes. That takes longer, but it's the premium fix when a static crop won't survive the whole shot.
Platform-Specific Aspect Ratios and Resolutions
Platform specs only help if you connect them to framing choices. A karaoke creator usually isn't asking, “What size does Instagram support?” The question is, “Which destination lets me keep my captions readable without rebuilding the whole layout?”
A useful baseline is this: modern phone-first platforms strongly favor vertical video because a traditional 16:9 clip uses only about 33% of a modern smartphone display, which helps explain why 9:16 became the standard format for TikTok, Instagram Reels, YouTube Shorts, and Snapchat, with 1080×1920 as a common export size. 4:5 (1080×1350) is also widely used because it fills more of the mobile feed than a square post without requiring full-screen playback, as outlined in this overview of social media video aspect ratios.
That's why platform choice and composition choice are tied together.
Platform Aspect Ratio and Resolution Reference
| Platform | Aspect Ratio | Resolution | Notes |
|---|---|---|---|
| YouTube long-form | 16:9 | 1920×1080 or 3840×2160 | Best for standard horizontal delivery. Good for lyric videos designed around wide lower thirds. |
| YouTube Shorts | 9:16 | 1080×1920 | Vertical framing needs careful caption placement. |
| TikTok | 9:16 | 1080×1920 | Tight safe-zone discipline matters because edge UI can cover text. A practical companion is this TikTok 9:16 format guide. |
| Instagram Reels | 9:16 | 1080×1920 | Full-screen vertical. Best when you've planned a centered composition. |
| Instagram feed | 1:1 or 4:5 | 1080×1080 or 1080×1350 | 4:5 often preserves more vertical presence than square while keeping more of the original frame than full vertical. |
| Facebook feed | 1:1 or 4:5 | Commonly matched to feed-friendly exports | Safer than aggressive vertical when reusing horizontal masters. |
| X and Twitter | 16:9 or 1:1 | Match chosen frame shape | Landscape works for trailers and widescreen previews. Square is often easier for repurposed clips. |
| 1.91:1 or 1:1 | Match chosen frame shape | Wider compositions can work well for business promos, but lyric-heavy layouts need extra care. | |
| 2:3 | 1000×1500 | Taller than square, less extreme than 9:16. Useful when you want a portrait feel without full vertical cropping. |
What actually works under deadline
For horizontal masters going into social feeds, 4:5 is often the most forgiving compromise. It gives you more mobile presence than 1:1 and usually requires less destructive cropping than 9:16. Microsoft's guidance also reflects that trade-off, noting that 4:5 can preserve more of the original frame than 1:1 while still using more screen space, while 9:16 remains dominant for TikTok, Shorts, and Reels in current editing workflows and expanding browser-based resizing features in 2026 projections, as described in Microsoft's article on changing the aspect ratio of a video.
For a broader planning view, I'd also keep a single reference doc for social exports, and this roundup of social media video specs is the kind of page that saves time when you're batch-delivering.
A platform spec tells you what the container should be. It doesn't tell you whether your composition survives inside it.
One more practical point. Frame-rate and duration choices matter too, but they don't rescue bad framing. A clean vertical crop with readable text will outperform a technically perfect export that slices through the lyric line.
Changing Aspect Ratio with FFmpeg, HandBrake, and Premiere
Different tools solve different deadline problems. FFmpeg is fastest when you need repeatable batch work. HandBrake is easier when you want a GUI but still need control. Premiere Pro gives you the strongest manual reframing when the automatic route won't protect captions or faces.
Here's the workflow I'd use in each.
FFmpeg for fast and repeatable exports
If you want to know how to change aspect ratio of video from the command line without stretching, the core idea is simple. Scale the source proportionally, then pad the remaining space.
For a 16:9 source going into a 9:16 canvas while preserving the full image, use a command like this:
ffmpeg -i input.mp4 -vf "scale=1080:-2:force_original_aspect_ratio=decrease,pad=1080:1920:(ow-iw)/2:(oh-ih)/2:black,setsar=1" -c:v libx264 -c:a aac output-vertical.mp4
What each part does:
- scale=1080:-2 keeps width within the target and lets FFmpeg calculate height proportionally
- force_original_aspect_ratio=decrease prevents stretching
- pad=1080:1920 creates the target canvas
- (ow-iw)/2:(oh-ih)/2 centers the image
- black sets the pad color
- setsar=1 resets the sample aspect ratio so the file doesn't import with anamorphic surprises
If you want a square version from the same source, the pattern stays the same:
ffmpeg -i input.mp4 -vf "scale=1080:-2:force_original_aspect_ratio=decrease,pad=1080:1080:(ow-iw)/2:(oh-ih)/2:black,setsar=1" -c:v libx264 -c:a aac output-square.mp4
For crop-based delivery instead of padding, replace the pad stage with a crop filter after scaling. That's faster, but only safe when you already know the edges aren't important.
Verification step for FFmpeg
After export, don't trust the filename. Open the file in MediaInfo or your NLE and confirm:
- Display size matches the intended frame
- Image isn't stretched
- Captions sit inside the safe area
- First and last lyric lines remain visible
Bench check: I always inspect the first frame, a dense lyric section, and the final frame. Those three points usually expose framing mistakes faster than scrubbing the whole file.
HandBrake when you want control without commands
HandBrake is a good middle ground for creators who don't want to script every export. The important work happens in the Picture tab.
Start with your source, then adjust these settings:
- Set the dimensions to your target frame.
- Disable any setting that stretches the source to fill the frame unnaturally.
- Use anamorphic settings carefully, especially if the source came from older broadcast or DVD material.
- Choose padding or border behavior based on whether you're preserving the full frame.
For karaoke exports, plain black padding is often the least distracting option because it doesn't compete with the lyrics. If your channel uses a branded layout, a blurred background or solid color can work too, but only if the text still reads cleanly.
Verification step for HandBrake
Check the preview before encoding, then check the completed file outside HandBrake. Preview windows can hide small clipping problems, especially on subtitle-heavy content.
Premiere Pro for manual reframing
Premiere Pro is where you go when one static solution won't hold for the whole clip. A singer moves left, the lyric animation lives at the bottom, and the logo appears on the right. That's not a resize job. That's editorial.
Create a sequence in the target frame, then bring in the wide master. From there:
- Scale proportionally, never non-uniformly
- Reposition the clip to protect faces and on-screen text
- Keyframe motion when the important subject moves across the frame
- Check text layers separately if they were built in the edit rather than burned into the source
If the lyrics are editable text layers, this gets much easier. You can redesign the composition for the new frame instead of forcing the original layout to survive.
A manual walkthrough is easier to follow when you can see the timeline behavior in action:
Verification step for Premiere
Export a short test segment before rendering the full piece. Pick the busiest section, where the subject, captions, and graphics all compete for space. If that segment survives, the rest usually does too.
CapCut as the quick-turn option
CapCut sits between template speed and timeline control. It's handy for social-first output when you need fast reframing and simple repositioning. The weakness is the same one you'll hit in most lightweight editors. It's easy to trust the preset and miss a clipped lyric line at the bottom edge.
Use it for quick platform versions. Don't use it blindly for text-dense masters.
One browser-based option for lyric creators
If you don't want a desktop app at all, MyKaraoke Video includes browser-based project sizing for widescreen, square, and portrait outputs, which fits creators who are already building karaoke or lyric videos in a web workflow. The key question is still the same as with any other tool: whether the chosen canvas keeps captions inside the safe zone before export.
That question matters more than the software brand.
Changing Aspect Ratio in a Browser-Based Editor
A browser editor makes sense when you need speed, shared access, or you just don't want another desktop app in the pipeline. For lyric work, the main advantage is immediate preview. You can see whether captions survive the new frame before you commit to a full render.

A clean browser workflow
Upload the master file first, then choose the project canvas size from the preset list. For most creators, that means selecting a widescreen, square, or portrait canvas based on the destination.
Once the new canvas is active, preview how the existing video and caption tracks sit inside the frame. Browser tools earn their keep. You can catch edge clipping immediately instead of finding it after export.
A practical walkthrough of that style of workflow is easier if you've seen a web editor built for it, and this article on a browser-based video editor shows the kind of setup that matters for caption-led projects.
Fit, Fill, and Stretch
These three options sound similar, but they're not.
- Fit keeps the entire source visible inside the new frame. You'll often get bars, but lyric legibility usually survives.
- Fill makes the frame look native to the destination by cropping the source to fill the canvas.
- Stretch forces the source to occupy the new shape, which usually distorts people, logos, and typography.
For karaoke and lyric videos, Fit is the safest default. Start there, then move to Fill only if you confirm the active lyric area remains protected.
Don't judge the result from the timeline thumbnail. Judge it from the live preview at a size where you can actually read the text.
Export checks that save rework
Before rendering, confirm the final output dimensions in the export dialog. If the platform asks for a social-ready upload, MP4 is the usual practical choice because it plays nicely across destinations.
I also recommend a filename convention that includes the platform shape in plain English. Something like song-title-vertical, song-title-square, and song-title-wide is boring, but it prevents accidental uploads later. That matters once you start producing multiple versions from the same master.
Common Problems and How to Fix Them
Most aspect-ratio failures are easy to diagnose once you know what symptom points to which setting. The trick is not to keep re-exporting blindly.
Aspect Ratio Problems and Fixes
| Symptom | Likely Cause | Fix |
|---|---|---|
| Faces look wide or thin | Non-uniform scaling or stretch mode was used | Reset scaling and use proportional scale with crop or pad instead |
| Captions are cut off at the sides or bottom | Safe zone wasn't checked before reframing | Rebuild the composition around the text area, or switch from crop to pad |
| Black bars appear when you didn't expect them | Display aspect ratio or source/frame mismatch | Check aspect flags, sequence settings, and whether the editor applied Fit instead of Fill |
| Export looks jagged or combed on motion | Interlacing or field-handling mismatch during conversion | Re-encode with the correct progressive settings rather than just remuxing |
| File dimensions are right but playback still looks wrong | Metadata or aspect flags are overriding display | Inspect the file in MediaInfo and normalize the aspect settings |
| Image quality drops after reframing | Over-scaling from a small source into a larger target | Avoid enlarging beyond what the source can support, or redesign the layout instead of forcing a fill |
The root causes producers hit most often
The most common mistake is still stretch-by-accident. It happens when a tool defaults to Fill behavior or when someone drags a transform box without locking proportions. The fix is simple. Undo the transform, restore proportional scale, then choose crop or pad consciously.
The second failure is clipped captions. That's a planning issue more than a software issue. Text-heavy videos need a central safe zone before any ratio change happens. If the lyrics were authored too close to the edge, no export trick will save them cleanly.
If your reframed file also looks rough or blurry, it's worth checking the source quality itself. This guide on how to fix pixelated pictures is useful because many “aspect ratio” complaints are really source-resolution problems that become obvious only after resizing.
A short pre-delivery checklist
Before you mark the export done, verify:
- Frame size matches the platform target
- Display shape matches what you intended
- Text stays inside visible safe zones
- No faces or logos are distorted
- Motion looks clean on playback
If one of those fails, don't guess. Trace the symptom back to the transform, crop, pad, or metadata setting that created it.
A Repeatable Workflow for the Next Project
The fastest editors don't solve aspect ratio from scratch every time. They use the same checklist on every master.
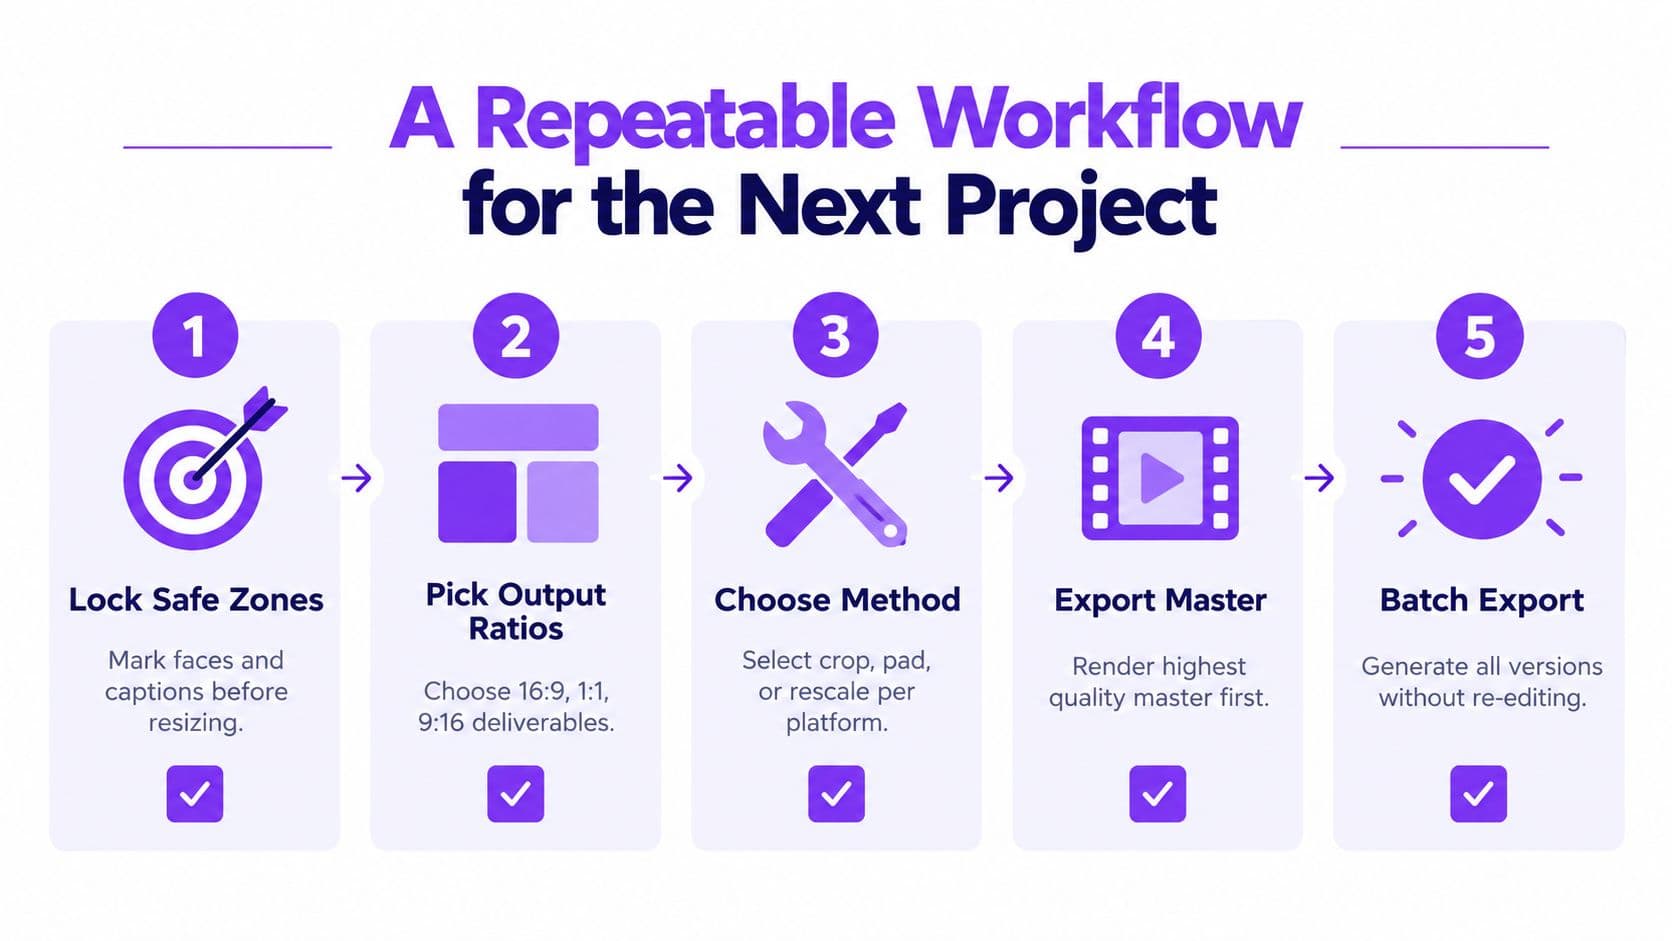
- Lock safe zones first. Mark faces, lyric lines, logos, and any other elements that can't be clipped.
- Choose the output shapes. Decide early whether the project needs wide, square, vertical, or all three.
- Pick the least destructive method. Crop if the edges are disposable, pad if nothing can be lost, redesign if the frame has competing priorities.
- Render and inspect a real frame. Don't trust thumbnails. Check the export at full size where the text is readable.
- Save reusable presets. Keep named outputs for recurring platform versions so the next project starts from a working template instead of guesswork.
Good aspect-ratio work doesn't come from memorizing presets. It comes from protecting the composition while adapting the container.
If you make karaoke or lyric videos regularly, MyKaraoke Video gives you a browser-based way to build, resize, and export versions for different platforms without installing a traditional editing stack. It's a practical fit when the job isn't just changing the frame shape, but keeping lyrics readable and aligned inside it.