Shrinking a MOV file is all about making it more manageable. You're taking a high-quality, often massive, video file and making it smaller so it's easier to share, upload, or simply store. Usually, this means converting it to a universally friendly format like MP4. The trick is to use software to intelligently reduce the file's bitrate or resolution, cutting down its size without a jarring drop in visual quality.
Why Bother Compressing MOV Files?
Before we jump into the "how," let's talk about the "why." You've just put the finishing touches on a fantastic karaoke video, but the final MOV file is enormous. This isn't just a small hassle; it's a real roadblock that can clog up your entire workflow, from sharing your creation to just keeping your hard drives from overflowing.
The MOV format, which comes from Apple, is a go-to for professional editing because it holds onto so much quality. That quality, however, comes at the price of file size. Our guide on different video file types digs deeper into how formats like MOV prioritize pristine quality, often creating files that are just too bulky for everyday use. That’s why compression isn't just a nice-to-have skill—it's essential for anyone creating video.
When Compressing MOV Files is a Lifesaver
Here are a few common situations where shrinking that MOV file is a must:
- Speeding Up Uploads: Ever tried to upload a multi-gigabyte MOV to YouTube or Vimeo? It can feel like it takes forever and often fails halfway through. A compressed file gets the job done in a fraction of the time.
- Sending Videos Over Email: Most email services cap attachments at around 25MB. If you need to send a quick clip to a client or collaborator, compression is your only option.
- Archiving Your Work: Keeping raw, uncompressed MOV files will eat through your storage space fast. Compressed versions let you archive your projects without constantly buying new hard drives.
- Ensuring Smooth Streaming: When you look at the advantages of pre-recorded video, you'll see that smaller files are critical for smooth playback. They use less bandwidth, giving your audience a buffer-free viewing experience.
The need for good compression tools is only growing. The global video compressor market hit a value of about USD 2.5 billion in 2023 and is expected to climb to around USD 5.8 billion by 2032. This surge shows just how critical efficient video handling has become in a world of high-quality content.
Choosing the Right Compression Tool
So, you need to shrink a .MOV file. The right tool for the job really boils down to what you're trying to accomplish. Are you in a hurry and just need something smaller to email, or are you a perfectionist who wants to tweak every last setting for the best possible quality?
The great news is you don’t need to spend a dime. There are fantastic, free options out there for everyone, from total beginners to seasoned pros. It's all about finding that sweet spot between dead-simple operation and granular control.
If you're after a quick fix, you can't go wrong with an online compressor or a built-in tool like Apple's QuickTime Player. These are designed for one purpose: to make your file smaller, fast. No complicated menus, no technical jargon—just a smaller file ready to go.
For those who want a bit more power under the hood, something like HandBrake or VLC Media Player is a perfect middle ground. They come packed with handy presets that take the guesswork out of compression, but they also let you dig into the settings if you feel the need to fine-tune things.
This infographic breaks down some of the common reasons why you might find yourself needing to compress a video in the first place.
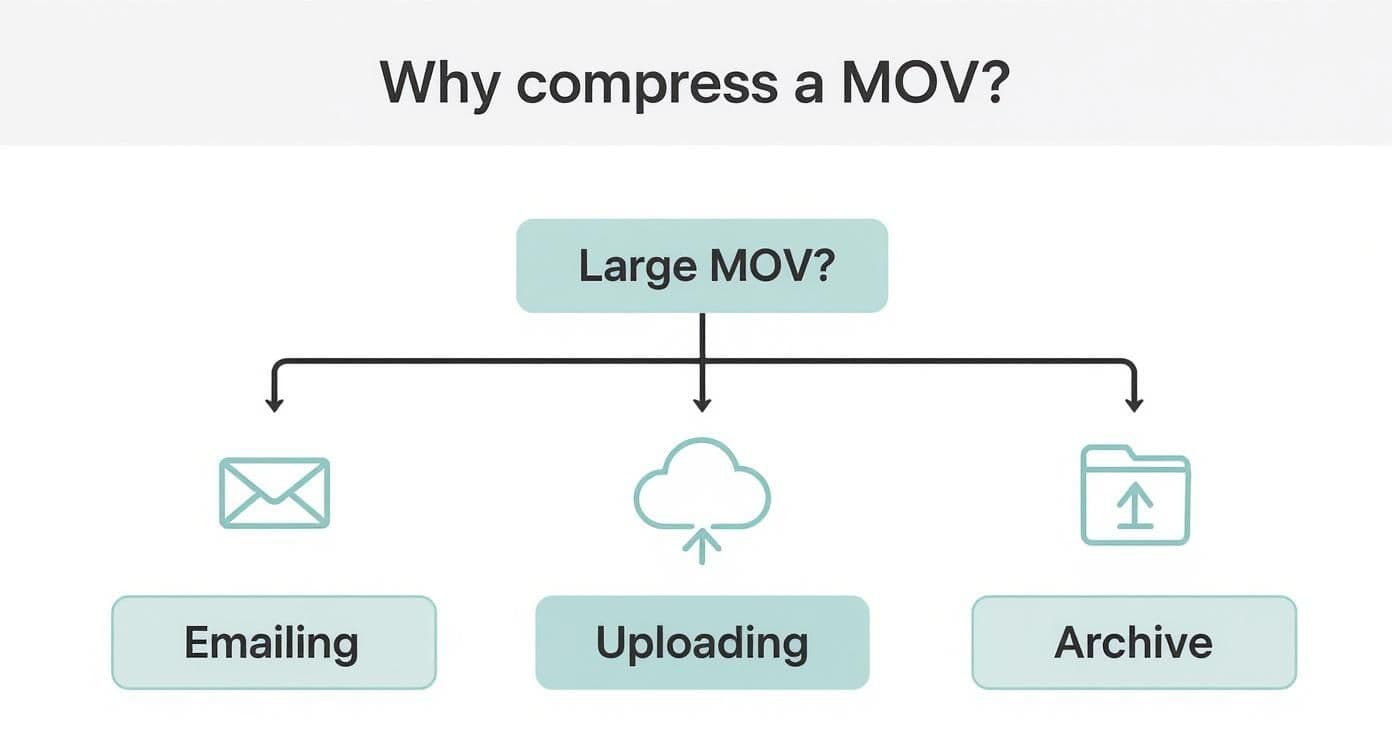
As you can see, whether you're uploading to a platform, trying to save storage space, or just sharing with a friend, a bulky MOV file is often a roadblock.
Then there’s the powerhouse: FFmpeg. This isn't your average point-and-click software. It's a command-line tool that offers absolute, total control over every aspect of your video. It’s the engine running behind many other video apps, and for anyone needing to automate or script complex compression tasks, it’s the undisputed king.
Finding Your Ideal Tool
At their core, all these tools do the same thing: they re-encode your video into a more efficient format. Most of the time, this involves converting video to H.264, which is the universal standard for web video today due to its excellent balance of quality and file size.
To make the choice easier, here's a quick cheat sheet based on your needs:
- For the Absolute Beginner: If you're on a Mac, start with QuickTime. For anyone else, a good online tool will get the job done in minutes.
- For the Curious Hobbyist: HandBrake is your best friend. Its presets are fantastic, and the quality slider is an intuitive way to manage the size-versus-quality trade-off.
- For the Pro and Power User: If you live in the terminal and want to process dozens of files at once, nothing beats the raw power of FFmpeg.
My Personal Tip: Don't just pick one and stick with it. I always recommend people take a short, 1-minute clip and compress it with two or three different tools. Seeing the results side-by-side is the fastest way to figure out which program gives you the look you want without a bunch of hassle.
To help you get a bird's-eye view, I've put together a quick comparison of the main options.
MOV Compression Tool Comparison
| Tool | Best For | Ease of Use | Key Feature |
|---|---|---|---|
| FFmpeg | Batch processing & ultimate control | Difficult | Unmatched command-line flexibility |
| HandBrake | Balancing quality, size, and ease of use | Medium | Excellent presets and quality slider |
| QuickTime | Mac users needing a simple, fast export | Very Easy | Built-in to macOS, no install needed |
| VLC | Quick conversions within a media player | Easy | Ubiquitous and multi-functional |
| Web Tools | One-off compressions without software | Very Easy | No installation required |
This table should give you a solid starting point. Each tool has its place, and what works for one project might not be the best for another.
Ultimately, there is no single "best" tool—only the best one for your specific workflow and comfort level. If you want to dive even deeper, we've reviewed a bunch more options in our comprehensive guide to the best video compressors.
Compressing MOV Files with HandBrake
When you need more control than a simple web tool but don't want to dive into the command line, HandBrake is your best friend. It’s a fantastic, free transcoder that hits the sweet spot between powerful features and a user-friendly interface. I've used it for years to prep videos for everything from web uploads to personal archives.
Once you install and open it, you’ll see a simple prompt to drop a file or folder. Just drag your MOV file onto the window, and HandBrake’s main dashboard will come to life with all the settings you’ll need to work with.
This is where all the magic happens. You'll load your MOV file here and get access to all the compression settings.
Don't let all the options intimidate you. The interface is cleverly organized into tabs like Summary, Dimensions, and Video, making it easy to find what you're looking for.
Navigating HandBrake Presets and Key Settings
The quickest way to get a great result is to start with HandBrake’s built-in presets. Think of them as pre-made recipes optimized for specific devices or platforms. You’ll find a list of them on the right side of the window.
For most web videos, including the karaoke and lyric videos we're focused on, the "Fast 1080p30" preset is a brilliant starting point. It's engineered to produce a high-quality video that plays nicely on platforms like YouTube while dramatically shrinking the file size.
Once you've selected a preset, you can tweak a few key settings for an even better result.
- Format: Always go with MP4. It's the universal standard and ensures your video will play on just about any device or browser without a fuss.
- Video Encoder: You'll generally choose between H.264 and H.265. H.264 is the old reliable—it works everywhere. H.265 (also called HEVC) is the newer, more efficient kid on the block, offering smaller files at the same quality. For maximum compatibility, especially with older devices, H.264 is the safer bet.
- Framerate (FPS): For a smooth, natural look, 30 FPS is the way to go. If your original MOV was shot at 60 FPS for something like slow-motion, you might want to keep it, but for standard playback, 30 is more than enough.
The evolution of video compression is a massive win for creators. Modern codecs like H.265 can cut file sizes by up to 50% compared to H.264 without any visible loss in quality. If you want to get into the weeds of these industry trends, you can discover more insights about video compression technology.
The Constant Quality Slider
Now for the most important setting in HandBrake: the Constant Quality (RF) slider. You'll find it under the "Video" tab, and it's your primary tool for balancing quality against file size.
It works a bit counterintuitively:
- A lower RF number means higher quality and a larger file.
- A higher RF number means lower quality and a smaller file.
For an H.264 encode, a great range to work within is RF 20-24. From my experience, RF 22 is the sweet spot for web video—the quality is excellent, and the file size savings are huge. I always suggest starting there, doing a quick test encode, and adjusting if needed.
Let's put this into practice. Say you have a 1-minute, 1080p MOV file that's a hefty 500 MB. By simply applying the "Fast 1080p30" preset and setting the RF to 22, you could easily shrink that file down to around 90 MB. That’s a reduction of over 80%, and most viewers would never spot the difference. The file is now a breeze to upload, share, or archive.
Using FFmpeg for Advanced Compression
If you're looking for surgical precision over your video compression, nothing beats FFmpeg. It’s a powerful, free, open-source tool that’s actually the engine running under the hood of many popular video apps.
There's a catch, though: it doesn't have a graphical interface. FFmpeg is a command-line utility, which means you'll be working in your computer's terminal (or Command Prompt on Windows). Instead of clicking buttons, you type out commands that tell FFmpeg exactly what to do. This approach is fantastic for batch-processing a folder full of MOV files or creating a repeatable "recipe" you can use over and over.
This level of control is how you get the perfect balance between file size and video quality, every single time.
Deconstructing a Basic FFmpeg Command
An FFmpeg command can look pretty intimidating at first, but it's really just a series of simple instructions strung together. Let's break down a typical command for converting a hefty MOV file into a web-friendly MP4.
Here’s the command we’ll dissect:
ffmpeg -i input.mov -c:v libx264 -crf 23 -preset medium output.mp4
Each part of that command, often called a "flag," has a specific job.
-i input.mov: This one's easy. The -i flag just means "input," and it points to the name of the file you want to compress.-c:v libx264: This flag sets the video codec.libx264is the encoder for H.264 video, which is the gold standard for compatibility across the web.-crf 23: This is the Constant Rate Factor, and it's the secret sauce. It functions just like the quality slider in HandBrake. A lower number means higher quality and a bigger file. From my experience, a value of 23 is a fantastic starting point that gives you great quality with a major reduction in file size.-preset medium: This tells FFmpeg how much effort to put into the compression. The presets range fromultrafasttoveryslow. Themediumpreset hits that sweet spot between encoding speed and file size efficiency.
And finally, output.mp4 is simply what you want to name your new, much smaller file.
Pro Tip: Never, ever run FFmpeg commands on your original file. Always make a copy first. This way, your high-quality source MOV stays safe and sound in case you want to go back and try different settings later.
A Practical Recipe for YouTube Uploads
Let’s put this into a real-world context. You've just finished a killer lyric video, but the MOV file is a few gigabytes. That’s a monster to upload. We can use FFmpeg to hit YouTube's recommended specs perfectly.
Try this command to get your video and audio fully optimized for streaming:
ffmpeg -i your_karaoke_video.mov -c:v libx264 -crf 21 -preset slow -c:a aac -b:a 192k -movflags +faststart final_upload.mp4
What did we change? We set the -crf to 21 for slightly better quality (since YouTube will re-compress it anyway) and used the slow preset, which takes longer but squeezes the file size down even more.
We also specified the audio codec (-c:a aac) with a bitrate of 192k, which is perfect for online video. The -movflags +faststart bit is a crucial final touch—it rearranges some data in the file so it can start playing immediately, even before it's fully downloaded.
Of course, getting the audio settings right is key. If you find the volume is too low before you compress, you can fix that first. We have a whole guide on how to boost the volume in your MP4 files.
Quick and Easy Compression Methods

Sometimes you don't need a professional-grade tool with a million settings. You just need to make a MOV file smaller, right now, so you can email it or get it uploaded without waiting forever. In those cases, you can probably use software that's already on your computer.
These methods are all about speed and simplicity. Think of it as the express lane for video compression—it gets the job done without any fuss, perfect for when convenience is more important than tweaking every last setting.
The progress in video compression is honestly incredible. A massive 4K MOV file, say 2 GB, can often be shrunk down to about 800 MB using a modern codec like H.265. That's a 60% reduction in size without any quality loss you'd notice with your own eyes. This efficiency is what makes sharing high-quality video practical. If you're curious, you can read the full research about these compression advancements to see just how far the technology has come.
Using VLC Media Player for a Quick Conversion
Most of us think of VLC Media Player as the tool that plays any video file you can imagine. But hidden inside is a surprisingly powerful conversion tool. If you have VLC, you already have a great video compressor ready to go.
Here's how to do it: open VLC and head to File > Convert / Save. Add your video, click the "Convert / Save" button, and then you'll see a profile dropdown menu. This is where the magic happens.
For the best results with minimal effort, I always recommend the ‘Video - H.264 + MP3 (MP4)’ profile. It's a fantastic preset that creates a much smaller, universally compatible MP4 file. It's my go-to one-click solution when I need to share something quickly.
QuickTime Player for Mac Users
If you're a Mac user, it gets even easier. You don't have to download a single thing. QuickTime Player, which comes standard on macOS, has a dead-simple export function that’s perfect for basic compression. Honestly, it's the simplest way to get your head around how to compress a MOV file on a Mac.
Just open your video and navigate to File > Export As. QuickTime will give you a few straightforward options based on resolution:
- 1080p: Great for keeping high quality for larger screens. It offers a nice balance between a smaller file and a crisp image.
- 720p: This is my sweet spot for web uploads. The file size is much more manageable, but it still looks sharp and professional in HD.
- 480p: Choose this when size is the only thing that matters. It’s perfect for getting a video small enough to email, though you'll sacrifice visual clarity.
Choosing a lower resolution is the fastest way to decimate a file's size. I once had a 55MB 1080p clip that needed to be emailed. Exporting it as 480p brought it down under 15MB—small enough for any attachment limit. The key thing to remember is that this is a permanent change; you can't get that resolution back once it's exported.
Troubleshooting Compression Headaches
Even with the best tools in your arsenal, you're bound to hit a few bumps in the road when compressing MOV files. It happens to everyone. The good news is that most of these "disasters" are actually simple fixes once you know what to look for.
The most common complaint I hear is a noticeable drop in quality. The compressed video looks blocky, blurry, or just plain pixelated, especially when things start moving quickly on screen. This is a classic sign of one thing: you've been a bit too aggressive with your compression settings.
The fix is almost always the same: go back and give the encoder more data to work with. If you're using HandBrake or FFmpeg, that means lowering the Constant Quality (CRF) value. Seriously, just nudging a CRF from 24 down to 22 can be the difference between a pixelated mess and a sharp, clean video.
When Audio and Playback Go Wrong
There's nothing more maddening than watching your perfectly compressed video, only to see the audio drift out of sync. This often happens because the original file was recorded with a variable frame rate, and the re-encoding process trips it up. The best defense is a good offense: in HandBrake, always check the "Constant Framerate" option before you start.
If the sync issue persists, you'll need to dig into the original file's properties. Find its exact frame rate and manually set your compression tool to match it perfectly. That usually locks everything back into place.
Sometimes, the video looks great, but it simply won't play on a specific device, like your smart TV or an older tablet. This isn't a quality problem; it's a compatibility issue. The device just doesn't understand the language—or codec—you used.
Here's a quick mental checklist to run through for playback problems:
- File Type: Is it an .mp4 file? This is the gold standard for compatibility.
- Video Codec: Did you use H.264? It's the universal workhorse. H.265 (HEVC) is newer and more efficient, but many older devices can't handle it yet.
- Audio Codec: When in doubt, stick with AAC. It's the default for a reason and plays nicely with just about everything.
And one last thing: if FFmpeg or HandBrake throws a cryptic error message at you, don't sweat it. Just copy and paste that error right into Google. I guarantee you're not the first person to see it, and someone, somewhere, has already posted the solution.
A Few Final Questions About MOV Compression
Still have a couple of questions floating around? Let's clear up some of the most common things people ask when they're trying to shrink a MOV file.
Will Compressing a MOV File Ruin the Quality?
Here's the honest answer: yes, technically it reduces the quality. But the whole point of smart compression is to do it in a way you'll barely notice, if at all.
We're using what's called "lossy" compression, which cleverly removes data the human eye is unlikely to miss. By using a modern codec like H.264 and a smart setting like Constant Quality (RF), you can drastically cut down the file size without any obvious hit to visual clarity. It's a trade-off, but for sharing online or saving space, it’s almost always the right move.
What's the Best Format to Convert a MOV File To?
For sharing and playback, MP4 is the undisputed champion. There's really no contest.
When you package H.264 video and AAC audio into an MP4 container, you've created the universal standard for web video. It’s a combination that will play back smoothly on just about any phone, computer, social media platform, or web browser you can think of.
Think of it this way: MOV is your high-quality master copy, perfect for editing. MP4 is the final, perfectly packaged version you hand out for everyone to enjoy.
Can I Compress a MOV File Without Installing Software?
You absolutely can. Plenty of online video compressors let you do this right from your browser. You just upload your MOV, their servers do the heavy lifting, and you download the smaller file.
They’re fantastic for a quick, one-off job. The catch is that they usually have limits on file size, offer fewer settings to tweak, and can be slow since you're depending on your internet connection for both the upload and download.
So, is MOV Better Than MP4?
Neither one is "better" than the other—they're just built for different parts of the video lifecycle. MOV is a favorite in professional editing workflows, especially on Macs, because it's designed to hold onto an incredible amount of quality.
MP4, on the other hand, is built for efficient delivery. Its strength lies in its excellent compression and universal compatibility, which is why it's the king of streaming, social media, and just about everything else online.
Ready to create stunning lyric or karaoke videos without wrestling with file sizes? MyKaraoke Video transforms your music and lyrics into professional-grade, web-ready MP4s in minutes, right in your browser. Start creating for free today at https://www.mykaraoke.video.