Ready to make your music not just heard, but seen? An audio wave visualizer is your ticket to turning a simple audio track into a dynamic visual experience. It's perfect for grabbing attention on platforms like YouTube, Instagram, and TikTok. Forget slapping on some static album art—it’s time to create videos that pulse and dance to every single beat.
Why an Audio Wave Visualizer Is Your Secret Weapon
Let's be real: in a world overflowing with content, amazing audio alone often isn't enough to stop the scroll. You have to snag people's attention visually, and you have to do it fast.
This is where a slick audio wave visualizer becomes more than just a cool effect; it’s a powerful tool for turning passive listeners into hooked viewers. Instead of just a still image, your audience gets to see the energy of your track, creating a multisensory experience that keeps them watching way longer.
And this isn't just some niche trend for electronic producers. It's a booming market. The demand for engaging audiovisual content pushed the global audio visualizer market to a value of roughly USD 1.2 billion in 2023. And it's not slowing down—projections show it rocketing to USD 3.5 billion by 2032, all thanks to its massive adoption in entertainment and media.
Beyond Basic Visuals
Creating a killer visualizer shouldn't require a degree in motion graphics or fighting with clunky software. The whole point is to cook up something that genuinely reflects your sound without getting bogged down in technical nonsense for days on end. This is precisely why a straightforward tool like MyKaraoke Video is such a game-changer. You can jump right past the confusing bits and get straight to the fun part: being creative.
The real magic happens when the visualizer doesn't just react to the sound but becomes part of the song's story. It should feel like an extension of your music, not just a layer on top of it.
What Makes a Visualizer Truly Pop?
A truly effective audio wave visualizer does more than just wiggle around to the bass. It needs to be thoughtful.
- Brand-Aligned: Do the colors, fonts, and overall style scream "you"? It should feel consistent with your artist identity or brand aesthetic.
- Platform-Optimized: A vertical video for a YouTube Short or TikTok Reel needs a different layout than a widescreen video for your main channel.
- Subtle yet Captivating: The best visualizers enhance the music without stealing the show. They add atmosphere and draw the eye in a way that feels natural, not distracting.
To give you a better idea of what you're working with, here’s a quick rundown of the features you'll find in MyKaraoke Video.
MyKaraoke Video Visualizer Feature Overview
Here's a quick look at the core features that make MyKaraoke Video the ideal choice for creating your audio wave visualizer.
| Feature | What It Does | Why It's Great for You |
|---|---|---|
| Customizable Visuals | Lets you change colors, add logos, and pick from different wave styles. | You can perfectly match the video to your brand's look and feel, ensuring consistency. |
| Multiple Formats | Export in various aspect ratios (16:9, 1:1, 9:16) and resolutions up to 4K. | Your visualizer will look amazing on any platform, from a YouTube premiere to an Instagram Story. |
| No Software to Install | The entire process is cloud-based and runs in your browser. | Get started immediately without downloads or system compatibility headaches. |
| Intuitive Interface | A simple, drag-and-drop editor designed for musicians, not video pros. | You save a ton of time and can focus on the creative side instead of a steep learning curve. |
These features are designed to get you from an audio file to a stunning, shareable video in minutes.
With the right approach, you can easily create an audio wave visualizer that grabs attention and makes your music unforgettable. If you're on the hunt for even more ways to animate your audio, you can dive into our guide on how to make a music visualizer online.
Alright, let's get to it and start turning your tracks into mesmerizing videos.
Setting Up Your First Visualizer Project
Alright, let's dive in and start making some magic. This is where the fun begins—transforming your audio track into a living, breathing visual with MyKaraoke Video. We're going to build your first audio wave visualizer from the ground up. Think of it less like a technical process and more like setting up your easel before you start painting.
The absolute most important ingredient here? Your audio file. Seriously. The punch and clarity of your visualizer depend entirely on the quality of your sound. A track that's muddy or mixed too low will give you a sluggish, boring visual. Before you upload anything, do yourself a favor: pop on some good headphones and give your track a final listen. Make sure it's clean, crisp, and has a solid volume level. A high-quality WAV or a high-bitrate MP3 will always give you the sharpest results.
Choosing Your Canvas and Template
Got your pristine audio file ready to go? Perfect. The next move is to get it into MyKaraoke Video and set the stage for your masterpiece. When you import your track, you’ll immediately face a crucial decision: the video's shape.
Are you aiming for a classic YouTube release? Then you'll want the standard widescreen 16:9 aspect ratio. But if this visualizer is destined for an Instagram Story, a Reel, or TikTok, you absolutely need to go with the vertical 9:16 format. Trust me on this—getting this right from the start will save you a world of cropping and resizing pain later on.
Once your audio is in, you’ll see a gallery of visualizer templates. Don't sweat this choice too much! These are just starting points, not final designs. Just pick one that feels right or has a shape you like. We're about to tear it apart and rebuild it to be completely your own in the next steps. The only goal here is to get a project open with a visualizer that's already bouncing along to your music.
This image gives you a peek under the hood at how sound actually becomes a visual.
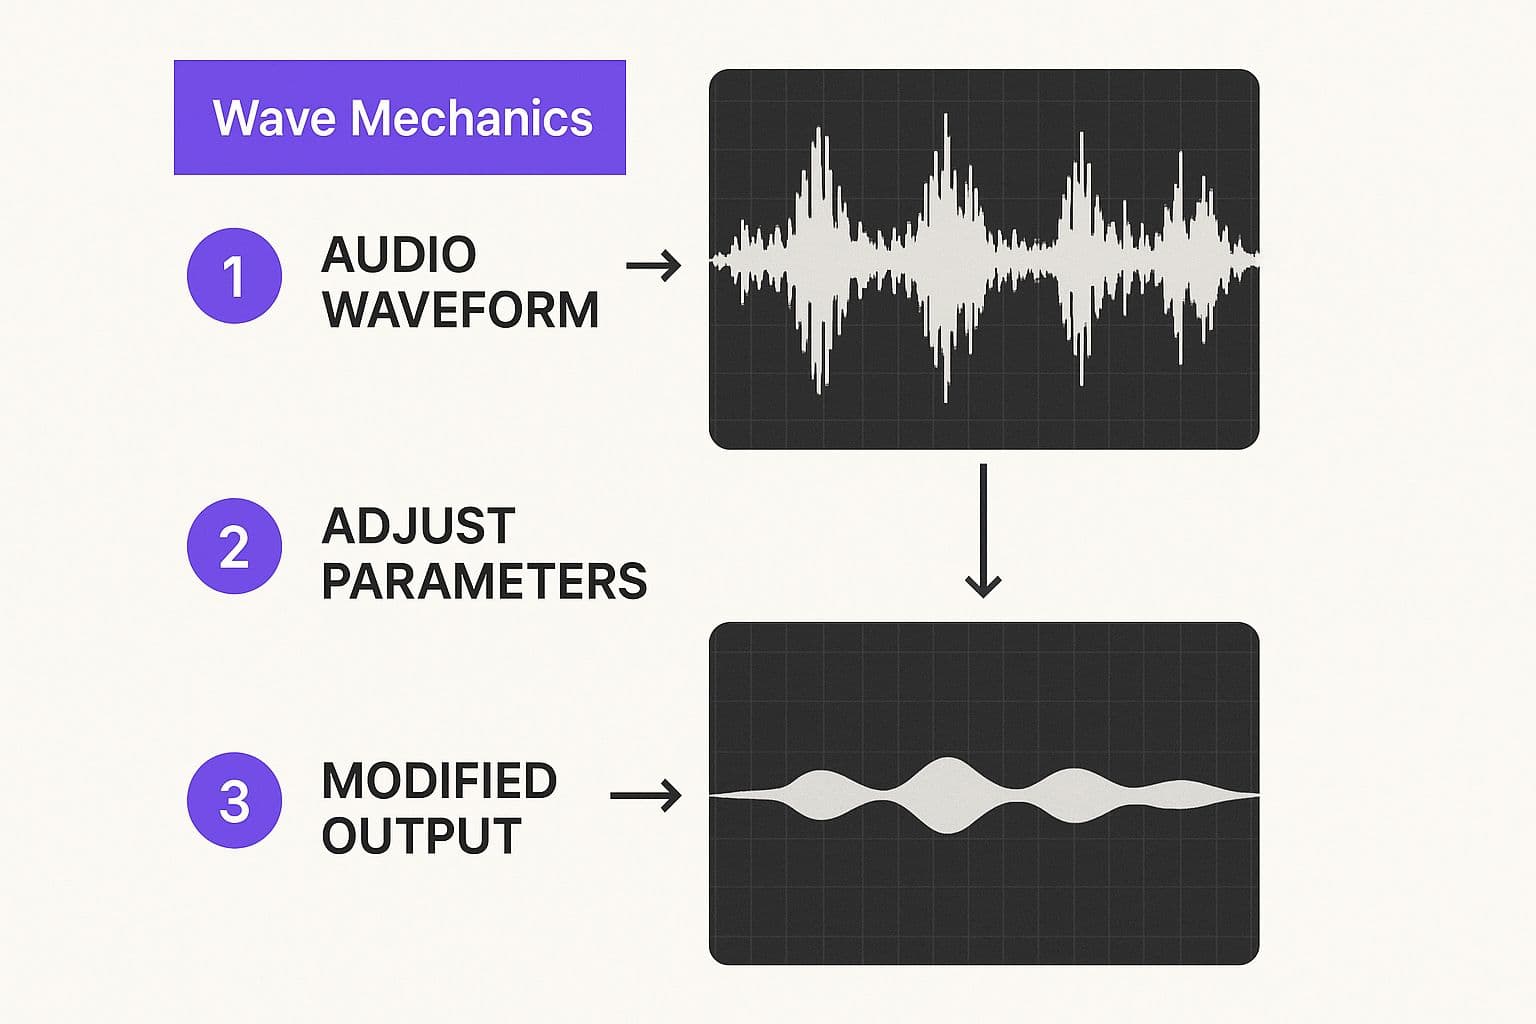
It’s a great breakdown of how the different frequencies in your song—the deep bass, the sharp hi-hats—create the unique shapes you see in the waveform. This is exactly why a sonically rich song with lots of dynamic shifts makes for a way more exciting visualizer than a track that’s compressed and flat.
My Personal Project Kickoff Checklist
After making hundreds of these things, I’ve got a little pre-flight checklist I run through every single time. It's saved me from countless face-palm moments and do-overs.
- Audio Sanity Check: Is the track a high-quality, mastered file? No demo versions!
- Aspect Ratio Lock: Did I pick the right dimensions for where this video will live? (YouTube, TikTok, etc.)
- Sane File Name: Is the project named something I'll recognize later? I always use a format like "Artist - Song Title - Visualizer v1."
- Background Vibe: Do I at least have a general idea for the background? A cool photo? A looping video?
An awesome audio wave visualizer is more than just a wiggly line—it’s the visual anchor for your entire video. Nailing the setup makes the creative part a whole lot more fun and the final product a whole lot better.
By getting these basics squared away, you’ve built a solid launchpad for the really creative stuff. Now you're ready to make this visualizer uniquely yours. And hey, if you get the bug to go even bigger, you can always check out our guide on how to make a music video that really turns heads.
Let’s get to customizing.
Making Your Visuals Vibe with Your Sound

Alright, this is where we get to play and the real magic happens. A basic visualizer gets the job done, sure, but a fully customized one? That’s what transforms your audio into a signature visual experience. It’s the difference between a rental tux and a bespoke suit—one fits, the other is you. Let's dig into the MyKaraoke Video settings to craft an audio wave visualizer that’s a true extension of your music.
We're moving beyond those cookie-cutter templates. The whole point is to make your video an unmistakable piece of your artistic identity. This isn’t just about making things look pretty; it's a smart play in a booming market. Seriously, the demand for this stuff is exploding. The audio visualizer market was valued at USD 1.2 billion in 2024 and is expected to rocket to nearly USD 2.5 billion by 2033. Why? Because people are hungry for more immersive content. You can read more about this audio visualizer market trend if you're curious.
So, let's get our hands dirty and make your visualizer impossible to ignore.
Finding Your Color Palette
Color is a shortcut to emotion. It’s the quickest way to set the mood for your track before the first note even hits. The default colors are just a suggestion box—the real power lies in cooking up a palette that actually sounds like your music.
- Steal from Your Album Art: Your album cover is a ready-made color cheat sheet. Use an eyedropper tool to pull the most dominant colors right from your artwork. This creates an instantly cohesive and professional vibe across all your content.
- Match the Genre Mood: What does your music feel like? A laid-back lo-fi track? Think soft pastels or warm, muted earth tones. An in-your-face rock anthem? That calls for bold reds, electric blues, and stark blacks to really smack the viewer.
- The Power of Contrast: This one is crucial. Always, always make sure your visualizer's colors pop against your background. A bright yellow waveform might look incredible over a dark, moody cityscape, but it’ll get completely lost against a bright, sunny sky.
Shaping the Waveform
Not all waveforms are built the same. The shape, style, and behavior of your visualizer can totally change the personality of your video. MyKaraoke Video gives you all the knobs you need to twist to get it just right.
For a recent lo-fi hip-hop track I produced, I went with a super smooth, rounded waveform. I dialed its sensitivity way down so it only bounced to the main kick and snare, creating this gentle, hypnotic pulse. The result was relaxing and perfectly captured the song's chill vibe.
But for an aggressive punk song? I did the exact opposite. I chose a sharp, jagged line visualizer and cranked the sensitivity all the way up. It went nuts reacting to everything—guitars, cymbals, vocals. The final look was chaotic and raw, a perfect visual match for the frantic energy of the track itself.
Pro Tip: Play around with the "thickness" or "weight" of the waveform. A thicker line feels more powerful and bass-heavy, which is great for dance or rock music. A thin, delicate line feels more precise and is perfect for highlighting high-frequency details like hi-hats or intricate synth melodies.
Adding Your Brand's Stamp
The final touch is putting your own identity right there on the screen. This is a non-negotiable for building brand recognition, especially when your video starts getting shared across different platforms.
You can easily overlay your artist logo or name. I always suggest tucking it into a corner where it’s visible but doesn’t get in the way of the main show. A subtle, semi-transparent logo usually looks way classier than a big, obnoxious one. You can even animate it to fade in after a few seconds for an extra professional flair.
Once you master these elements, your audio wave visualizer stops being just a video. It becomes your visual handshake.
Pro-Level Effects for a Polished Look
https://www.youtube.com/embed/-dHiJII6jIY
Alright, so you've nailed the colors and shaped your waveform. Your video is looking solid, but you're not aiming for "solid"—you're aiming for unforgettable. This is where we sprinkle in that extra magic, the details that separate a decent video from a truly professional one. It's time to layer in some advanced effects that will give your audio wave visualizer real depth, atmosphere, and that cinematic flair.
Ready to make your creation look seriously dynamic? Let's dive into some pro-level tricks. It's funny, a lot of creators stop after getting the basics down, but these subtle additions are exactly what will make your video stand out and feel like it had a massive budget behind it.
Layering Visualizers for Richness
Here's one of my favorite tricks for a more complex and engaging look: stack multiple visualizers on top of each other. Think of it like layering instruments in a song. A single visualizer can sometimes feel a little flat or thin, especially during the quieter parts of a track. By layering two, you can create a much richer, more responsive visual experience.
A killer combination I often go back to is a thick, bold waveform that's set to react only to the low-end frequencies—your kick drum and bassline. Then, I'll pair that with a second, much thinner visualizer that captures the entire frequency spectrum. What you get is this solid, pulsing foundation with all the delicate, high-frequency details dancing right on top. It adds a ton of visual interest without ever looking messy or cluttered.
Creating Atmosphere with Particle Effects
Atmosphere is everything. Seriously. It’s the secret ingredient that gives your video a distinct mood and makes it feel like a living, breathing space. This is where the particle effects in MyKaraoke Video become your absolute best friend.
Just picture it: you have a visualizer for a slow, melancholic piano piece. Now, imagine adding a layer of slow-drifting, out-of-focus dust motes gently catching the light. Instantly, the whole video feels more intimate and thoughtful. The vibe completely changes.
Here are a few ideas to get your creative gears turning:
- Floating Embers: This is perfect for an intense or passionate track. The glowing sparks can rise and fall with the music's energy, adding a fiery, dramatic feel.
- Gentle Snowfall: Got a holiday song or just a chill, wintery tune? A subtle snow effect can completely transform the scene and set the mood perfectly.
- Digital Glitch: For electronic, synth-heavy, or industrial music, adding a touch of digital noise or a "glitch" effect makes your video feel more techy, edgy, and modern.
The real key with particle effects is subtlety. Your goal is to add texture and mood, not unleash a distracting visual blizzard. Trust me, a little goes a very long way in making your audio wave visualizer feel more alive.
Animation and Movement That Syncs
Nothing kills the vibe faster than static elements in a dynamic video. The best visualizers have motion everywhere, even if it's subtle, and it's all timed perfectly to the rhythm and feel of the music.
My absolute secret weapon? Adding a subtle camera shake effect timed to the biggest moments in the song. When that chorus hits with a massive downbeat, a quick, punchy camera shake makes the impact feel a hundred times bigger. It’s a classic filmmaking trick that works wonders for music videos.
And don't just let your album art or logo sit there like a bystander! Make it part of the performance. Animate your album art to gently pulse in time with the kick drum. Have your artist name fade in elegantly during the intro and then fade out smoothly at the end. These small, synchronized animations are what tie the entire video together, making it feel cohesive and professionally choreographed. They're the final details that hook your viewers and refuse to let them go.
Exporting and Sharing Your Masterpiece
Alright, you've done the hard part. You’ve tweaked the colors, perfected the wave’s movement, and your audio wave visualizer is looking absolutely killer. Now it’s time for the grand finale: getting it out into the world for everyone to see and hear.
This last step is where your art meets the audience, but hitting that export button can feel like a final exam with all its settings and options. Don't sweat it. Getting this right is simply about knowing where your video will end up. A visualizer destined for a big-screen TV needs a different treatment than one made for a quick scroll on TikTok.
Dialing in the Perfect Export Settings
Let's cut through the technical jargon. The two settings that matter most are resolution and bitrate.
Think of resolution as the sharpness of your video—like the difference between standard definition and crystal-clear 4K. Bitrate, on the other hand, is the amount of data packed into each second. A higher bitrate gives you stunning quality but also a beefier file size that can take forever to upload. It's all about finding that sweet spot.
MyKaraoke Video keeps things straightforward, but to make it even easier, here's a quick reference table for the settings that work best on the big social platforms.
Recommended Export Settings for Popular Platforms
Use this as your cheat sheet for exporting videos that look fantastic without the endless upload times.
| Platform | Recommended Resolution | Recommended Bitrate | File Format |
|---|---|---|---|
| YouTube | 1080p (1920x1080) or 4K (3840x2160) | 8-12 Mbps | MP4 |
| 1080x1350 (Portrait) or 1080x1920 (Reels/Stories) | 3-6 Mbps | MP4 | |
| TikTok | 1080x1920 (Full Screen Vertical) | 5-10 Mbps | MP4 |
Notice a pattern? MP4 is your best friend here. It’s the universal standard for a reason, offering a great balance between quality and manageable file size. For YouTube, go for the highest quality you can. For Instagram and TikTok, a slightly lower bitrate is totally fine and will get your video in front of fans much faster.
A quick pro-tip: A gorgeous video can't save muddy audio. If you're listening back and the sound isn't quite popping, it's worth taking a moment to polish it up. Check out our guide on how to https://www.mykaraoke.video/blog/how-to-enhance-audio-quality for some tips on getting that studio-quality sound.
Beyond the Export: Making Your Video Discoverable
Your job isn't quite done when the progress bar hits 100%. A fantastic visualizer can easily get lost in the digital noise without the right strategy.
First, write a caption that hooks people in. Tell the story behind the song, ask a question to get the comments rolling, and drop links to your Spotify or Bandcamp. Give them something to connect with.
Next up: hashtags. Get inside the head of your potential fans. What would they be searching for? Use a mix of broad tags like #audiovisualizer or #musicvideo, genre-specific ones like #synthwave or #indiefolk, and, of course, your own artist name.
Now that your visualizer is polished and ready, it's time to get it seen. To really make an impact, it helps to understand the game. You can learn how to master video marketing for social media and turn your visualizer into a powerful tool for growing your audience.
Alright, let's dive into some of the questions that inevitably pop up when you're getting your hands dirty with audio wave visualizers. Even the most intuitive tools can leave you scratching your head at times. It happens to everyone!
Think of this as a friendly chat over coffee, where I share a few things I've learned from being in the trenches. We'll cover everything from why your waveform looks like it's taking a nap to how to make your final video truly your own.
"Help! My Visualizer Isn't Moving!"
This is the big one. That heart-sinking moment when you import your masterpiece, and the visualizer just sits there, flat as a pancake. Don't panic! Nine times out of ten, this isn't a bug; it’s an audio issue.
Your visualizer needs something to "listen" to. Specifically, it needs dynamic range—that sweet spot between the quietest whispers and the loudest bangs in your track. If your audio is super quiet or has been squashed by over-compression (a common issue with mastered tracks), the visualizer has no data to work with.
Before you start messing with a million settings, try this: export a louder version of your audio file. Seriously, just boosting the overall volume is often the magic bullet that wakes it right up.
If you’ve tried that and it’s still snoozing, peek at the frequency settings. Some tools let you isolate certain frequencies. Make sure you haven't accidentally told it to only listen to the sub-bass on a flute solo. Keep it set to the full spectrum unless you're intentionally trying something advanced.
"What Kind of Background Should I Use?"
Choosing a background is less about rules and more about feel. It’s a balancing act. You need something that enhances the vibe of the music but doesn't wrestle with your visualizer for attention. The two magic words are contrast and mood.
- Got a high-octane banger? Go for it! Fast-moving abstract visuals or energetic, looping video clips can amplify that feeling. You want to match the energy.
- Working with a chill, ambient piece? Think slow. A gentle, drifting texture, a peaceful landscape shot, or even a simple, elegant color gradient works beautifully. A chaotic background here would just feel wrong.
Here's a pro tip I swear by: Squint at your screen. Can you still clearly see the waveform dancing? Perfect. If it disappears into the background, you know your background is too busy and stealing the show.
"How Can I Make My Visualizer Stand Out from the Crowd?"
Of course you can! This is where the fun really begins. Moving beyond the default templates is how you develop a signature style. The secret sauce is often in combining effects, not just picking one.
Don't be afraid to layer things up. Why settle for a single visualizer style when you can have two?
For example, I love to use a thick, solid bar visualizer for the low-end frequencies to show the bass kicking, and then layer a spikier, more frantic line visualizer on top for the treble and hi-hats. This creates a depth and texture that feels incredibly custom and dynamic.
You can also add subtle motion to your background image. A slow, almost imperceptible zoom-in or a quick "glitch" effect timed to a beat can add that professional polish that makes people notice.
Ready to stop troubleshooting and start creating? MyKaraoke Video has all the controls and creative freedom you need to build a jaw-dropping audio wave visualizer in minutes. Give it a try and bring your sound to life!