
If you've ever wondered how to make your audio sound truly professional, it really boils down to getting four things right. Think of it as a journey with four key stops: first, you capture a clean recording. Next, you clean up any unavoidable noise. Then, you creatively mix all the elements together. Finally, you add that last coat of polish with mastering. Nail these four pillars, and you'll transform muddy, amateur audio into something that genuinely shines on any platform.
Your Guide to Crystal Clear Audio
Let’s be real: amazing audio isn't about dropping a fortune on the most expensive gear. It's about knowing the right techniques. This guide is your roadmap from muffled, messy recordings to polished, professional sound, and we're skipping the confusing jargon to get straight to what actually works. I like to think of it as building a house—each stage creates a solid foundation for the next.
We’re going to walk through how to nail the recording from the very start, surgically remove those annoying background hums and hisses, and then creatively mix everything for maximum impact. To wrap it all up, you'll learn how to apply that final mastering touch that makes your audio sound fantastic everywhere. The secret is understanding how each stage builds upon the last.
This whole process is about preserving quality from start to finish. If you start with a great recording, the rest of the job becomes infinitely easier.
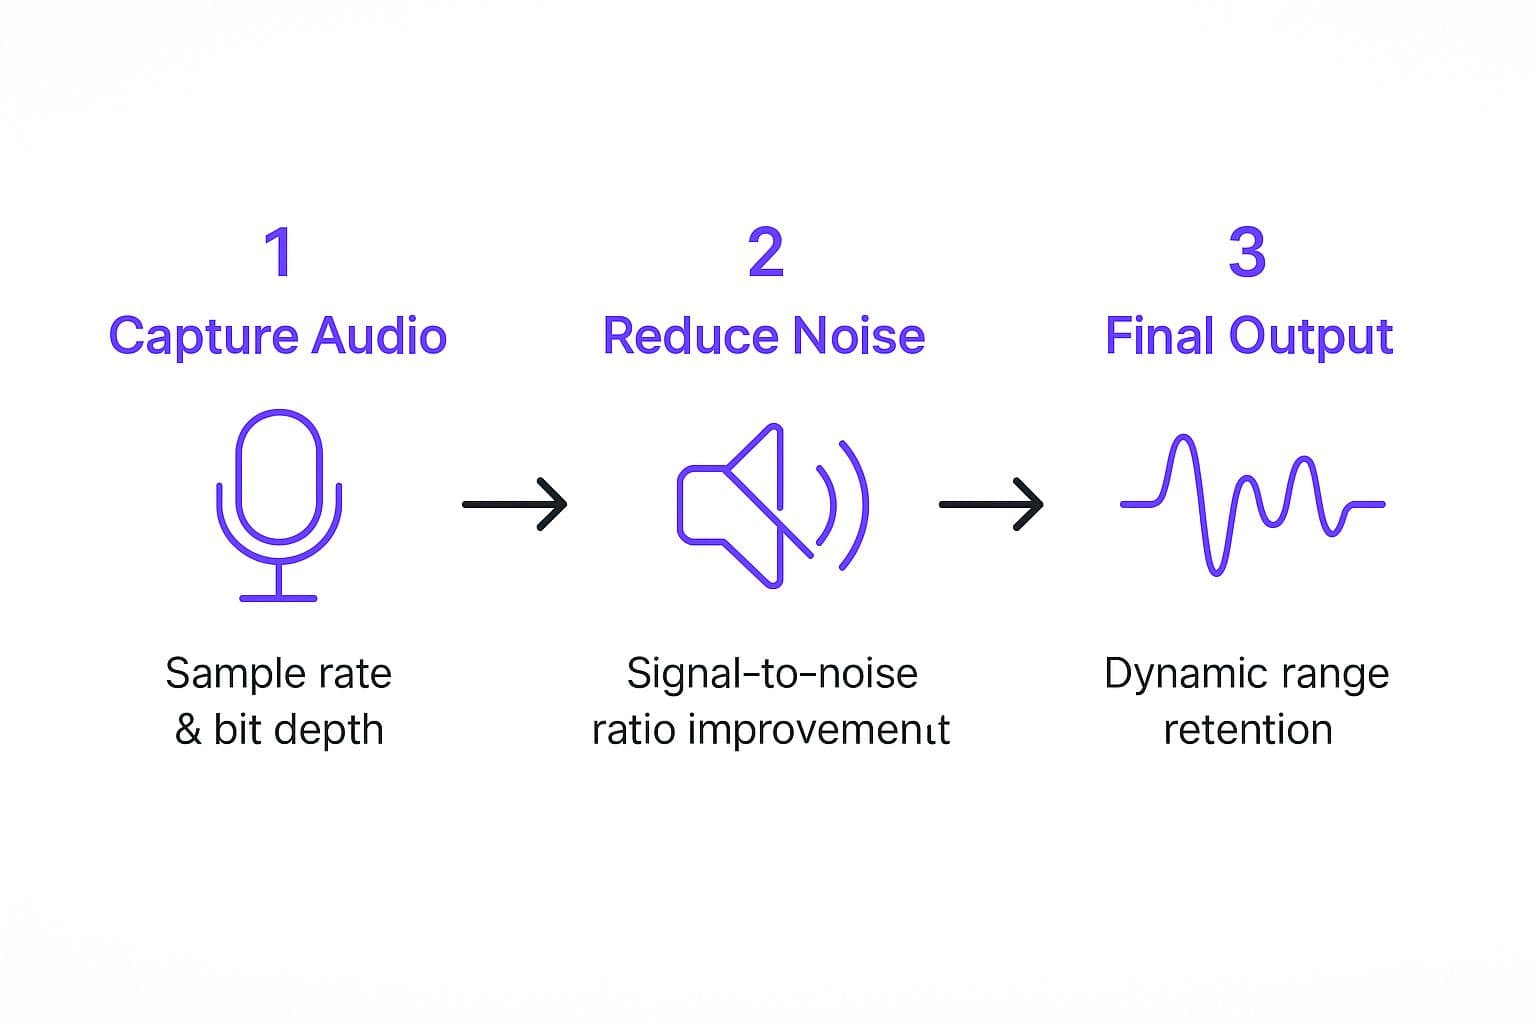
As you can see, keeping that digital information high-quality from the get-go makes noise reduction way more effective and ensures your final audio file has that rich, full dynamic range you’re after.
The Four Pillars of Audio Enhancement
To really get a handle on this, it helps to see the whole process as a series of distinct, but connected, phases. Each one has a clear goal, and by focusing on them one at a time, you can methodically improve your sound without getting overwhelmed.
Here's a quick breakdown of what each pillar involves and why it's so important.
| Stage | Primary Goal | Key Action |
|---|---|---|
| Recording | Capture a clean, detailed signal | Minimize room noise and optimize mic placement |
| Noise Reduction | Remove unwanted sounds | Surgically eliminate hiss, hums, and clicks |
| Mixing | Balance all audio elements | Ensure voice, music, and effects sit together well |
| Mastering | Ensure consistent playback | Adjust overall loudness and tone for all devices |
Tackling audio in this structured way helps you focus your efforts where they'll make the biggest difference.
The demand for great audio is exploding. The consumer audio market was valued at an eye-watering USD 112.84 billion in 2024 and is projected to hit USD 343.60 billion by 2033. This isn't just audiophiles; it's everyone, from gamers with high-end headsets to families using smart speakers. As you can read in this consumer audio market report, listeners everywhere not only appreciate but expect high-quality sound.
My Two Cents: I can't stress this enough—you can't "fix it in post" if the original recording is a disaster. A great recording is 80% of the battle. Seriously, spending an extra 10 minutes on microphone placement and quieting the room will save you hours of headaches later.
Nail the Recording for Flawless Sound
You've probably heard the phrase, "We'll fix it in post." Let me tell you, that's one of the biggest lies in audio production. The real secret to getting that polished, professional sound is to capture a fantastic recording right from the jump. Think of it like cooking a great meal—you can't turn cheap, expired ingredients into a five-star dish, no matter how skilled the chef. A clean recording is your foundation. Get this right, and you'll save yourself from a world of hurt later.

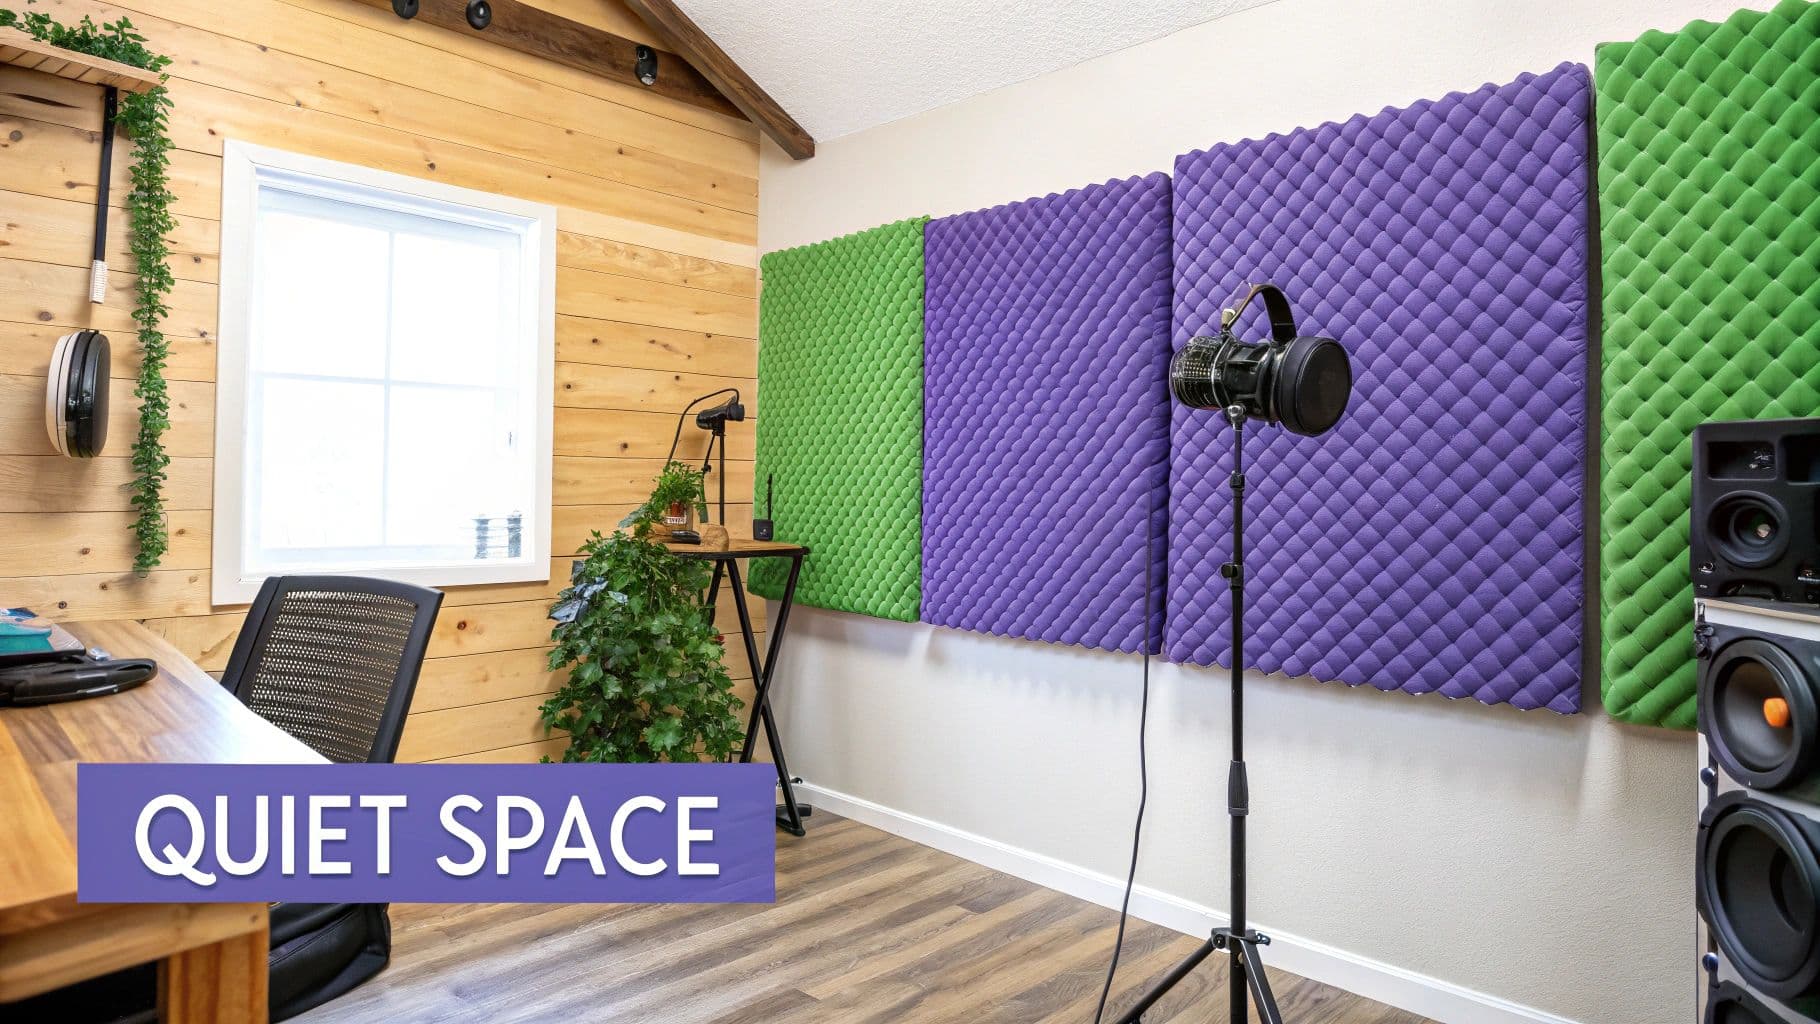
The best part? You don’t need a fancy, soundproofed studio that costs a fortune. Your recording space could be a corner of your bedroom, a spare office, or even a walk-in closet. The mission is to create a space that’s acoustically "dead"—a room that soaks up sound instead of bouncing it all over the place.
Your Makeshift Vocal Booth
The archenemy of clean audio is reverberation, or "reverb." That's the echoey, hollow sound you get in big, empty rooms with hard surfaces like bare walls and wood floors. Your microphone is ruthless; it will pick up every single one of those reflections, making your voice sound distant and amateurish.
But we can fight back with some common household items.
- Blankets & Pillows: Get creative! Drape heavy blankets over doors, chairs, or even a spare mic stand behind you. Pile pillows in the corners of the room—this is where pesky bass frequencies love to gather and get all boomy.
- Rugs & Carpets: If you're on a hardwood or tile floor, laying down a thick rug is a game-changer. Seriously, this one move can slash echo dramatically.
- Soft Furniture: Got a comfy couch or a stuffed armchair? That’s basically a giant sound absorber. If you can set up your recording station near one, you're already ahead.
Your goal is to surround your microphone with soft, squishy, irregular surfaces. I once recorded a killer voice-over by building a tiny fort out of couch cushions on my desk. Sure, it looked absurd, but the audio was crystal clear.
Key Takeaway: Your closet is your secret weapon. It's small, and all those clothes hanging up act as perfect, free acoustic treatment. It might feel a little cramped, but recording in a closet is a time-honored trick for getting clean, dry vocals on a shoestring budget.
Microphone Choice and Placement
Alright, let's talk microphones. While the options are endless, the most important thing isn't the price tag—it’s how you use it. For most voice work, a quality condenser microphone is a fantastic choice because of the rich detail it captures. On the other hand, a dynamic microphone is tougher and better at rejecting background noise, which is perfect if your recording space is less than ideal.
Once you have your mic, placement is everything. Don't just plop it in front of your mouth and hope for the best.
- Use a Pop Filter: This little screen that sits between you and the mic is absolutely non-negotiable. It catches those harsh bursts of air from 'P' and 'B' sounds (called plosives) that can completely blow out a perfect take.
- Find the Sweet Spot: A great starting point is to position the microphone about 6-8 inches from your mouth. An easy way to measure this is the "hang loose" sign—the distance between your thumb and pinky.
- Go Off-Axis: Instead of speaking directly into the front of the mic, try angling it slightly so you're speaking just past it. This simple trick can soften sharp 'S' sounds (sibilance) and give you a much more natural, pleasant tone.
Setting Your Gain Levels
Last but not least, before you even think about hitting that red button, you have to set your gain. Gain is simply the input level for your microphone. If you set it too low, you'll have to crank it up in your software later, which also cranks up all the background hiss and hum. But if you set it too high, you'll get digital clipping—a nasty, distorted crackle that is completely unfixable. It's a recording's death sentence.
Your target is to have your voice peak somewhere around -12dB to -10dB on your software's meter. To test it, say your loudest line or give a good laugh. If that meter ever hits the red, your gain is too high. Back it down until even your loudest moments stay comfortably in the green or yellow zone. A clean recording at the right level makes every other step, from mixing to syncing, a breeze. Speaking of which, if you're working with video, you can learn more about how to sync audio and video in our detailed guide.
Time to Banish Unwanted Background Noise
Alright, you’ve got a clean recording. High five! Now comes the really satisfying part: playing sonic surgeon. This is where we get obsessive and hunt down every last audio gremlin that snuck into your recording.
I'm talking about that sneaky, low-level hiss from your gear, the hum of a distant AC unit, or those random mouth clicks and pops that just... happen. Getting rid of this stuff is non-negotiable if you want that polished, professional sound.
The key here is finesse. Your mission is to surgically remove the bad stuff without hurting the good stuff. If you go too hard, you’ll end up with a robotic, watery mess that sounds worse than when you started. A light touch and the right tools, however, will give you that crystal-clear audio you’re after.
The Right Tool for the Right Noise
Let's get one thing straight: not all noise is the same. You can't just slap a single filter on everything and call it a day. Your Digital Audio Workstation (DAW) probably has some surprisingly good stock plugins, so let's dig into what to use and when.
- For the silence between words: A Noise Gate or an Expander is your first line of defense. Think of it as an automatic mute button. You set a volume level, and anything quieter than that—like room hiss in your pauses—gets silenced. It’s brilliant for cleaning up the gaps, but it won’t touch any noise that’s happening while you’re speaking.
- For constant, annoying hum: If you’re dealing with a persistent fan hum, electrical buzz, or air conditioner noise, you need a dedicated Noise Reduction plugin. These tools are genius. You find a few seconds of silence where only the noise is present, let the plugin "learn" that sound, and then it subtracts that noise fingerprint from the entire track.
My Two Cents: When you're using a noise reduction plugin, less is always more. Seriously. Start by pulling the noise down by just 6-8dB. Pushing it too far is what gives you that dreaded "underwater" sound. It's almost always better to leave a tiny, unnoticeable bit of noise than to get too aggressive and ruin your vocal tone.
Going Deeper with Spectral Repair
Sometimes you run into a problem that a standard plugin can't fix. You nailed the perfect interview take, but a dog barks right in the middle of a sentence. A lawnmower starts up outside. A phone buzzes on the table. Ugh.
This is where spectral repair feels like actual magic.
Found in specialized software like iZotope RX or built into some high-end DAWs, this tech gives you a visual map of your audio's frequencies. Instead of a simple waveform, you see a spectrogram where you can literally spot the problem. That dog bark will show up as a bright yellow splotch. Using a tool that works like Photoshop’s healing brush, you can just paint it out, leaving the voice underneath almost perfectly intact.
Learning to use spectral repair is a game-changer. It can rescue recordings that you would have otherwise thrown in the trash. It takes practice, but it's one of the most powerful audio cleanup skills you can develop.
And this kind of tech is only getting bigger. The global AI audio enhancer market was valued at around USD 800 million in 2023 and is projected to skyrocket to USD 3.5 billion by 2032. Why? AI is making incredibly complex tasks like this more accessible to everyone. You can discover more about the AI audio market trends to see just how big this is getting.
Common Audio Problems and Their Solutions
Feeling overwhelmed? Don't be. Most issues fall into a few common buckets. Here's a quick cheat sheet for the problems you'll face most often.
| Audio Issue | Primary Cause | Recommended Tool/Technique |
|---|---|---|
| Steady Hiss or Hum | Electrical interference, fan noise, preamp noise floor | Noise Reduction plugin (fingerprint-based) |
| Noise in Silent Gaps | Low-level room tone or microphone self-noise | Noise Gate or Expander |
| Sudden, Isolated Noises | Coughs, clicks, door slams, phone notifications | Spectral Repair or manual editing (cutting the sound out) |
| Mouth Clicks/Pops | Saliva sounds, plosives missed by the pop filter | De-clicker plugin or manual editing on the waveform |
Ultimately, cleaning up your audio is all about listening carefully and picking the right weapon for the job. Once you’ve combined these techniques to silence the noise, your track will be prepped and ready for the fun part: mixing.
Mix Your Audio for Clarity and Impact
Alright, you’ve got a clean, noise-free recording. Fantastic. Now, the real artistry begins. This is the mixing stage, where you take that technically solid audio and breathe life into it, making it dynamic, engaging, and professional. It's less about turning knobs and more about making creative choices that tell the listener’s ears exactly where to go.
We're going to zero in on the three pillars of mixing: Equalization (EQ), Compression, and Effects. Get a handle on these, and you'll truly understand how to enhance audio quality and give your project that polished, "radio-ready" sound. This is where you'll learn how to make a voice sit perfectly on top of a music track, instead of fighting with it.
Sculpt Your Sound with Equalization
Think of an equalizer (EQ) as a sonic chisel. Its job is to control the volume of specific frequencies in your audio—the booming lows, the present mids, and the crisp, sparkly highs. A classic rookie mistake is to just boost frequencies you want more of.
The real magic of EQ, however, is in what you take away.
This is called subtractive EQ, and it's the secret sauce for creating clarity. Let's say your voice recording sounds a bit muddy or boomy. That's almost always a pile-up of low-mid frequencies, usually somewhere around 200-500 Hz. Instead of cranking up the treble to compensate, try gently cutting those muddy frequencies. The voice will instantly sound clearer without getting harsh or thin.
Pro Tip: When you’re mixing a voice over music, use EQ to "carve out" a space for the vocals. The critical frequencies for vocal clarity sit right in the 1-4 kHz range. By making a small, gentle cut in that exact same range on the music track, you create a little pocket for the voice to nestle into. They stop fighting for the same sonic real estate.
This trick is a game-changer. It lets the voice cut through clearly without you having to jack up its volume and drown out the music. It’s a subtle move that screams professionalism. And if you're working on a project where you need to separate vocals and music completely, you might find our guide on how to remove the vocals from a song incredibly useful for creating your own instrumental tracks.
Add Punch and Consistency with Compression
Next up: compression. If EQ is your chisel, compression is your automatic volume-fader. It intelligently makes the quiet parts of your audio louder and the loud parts quieter. The result? A much more consistent, punchy, and professional sound.
Imagine someone speaking who drifts from a whisper to a shout. A compressor smooths all that out so your audience isn't constantly reaching for the volume knob.
Every compressor has a few key settings you need to know:
- Threshold: This sets the volume level where the compressor kicks in. Any sound that crosses this line gets turned down.
- Ratio: This decides how much the sound gets turned down. A 2:1 ratio is gentle and great for starters. A 4:1 ratio is more aggressive and noticeable. For voiceover, a ratio somewhere between 2:1 and 3:1 is usually the sweet spot.
- Attack & Release: These knobs control how fast the compressor reacts. A fast attack grabs sudden peaks instantly, while a slower attack lets the initial "snap" of a sound through before it clamps down.
- Makeup Gain: Because compression turns down the loudest bits, the whole track gets quieter. Makeup gain lets you boost the entire signal back up, making it sound fuller and more powerful than before.
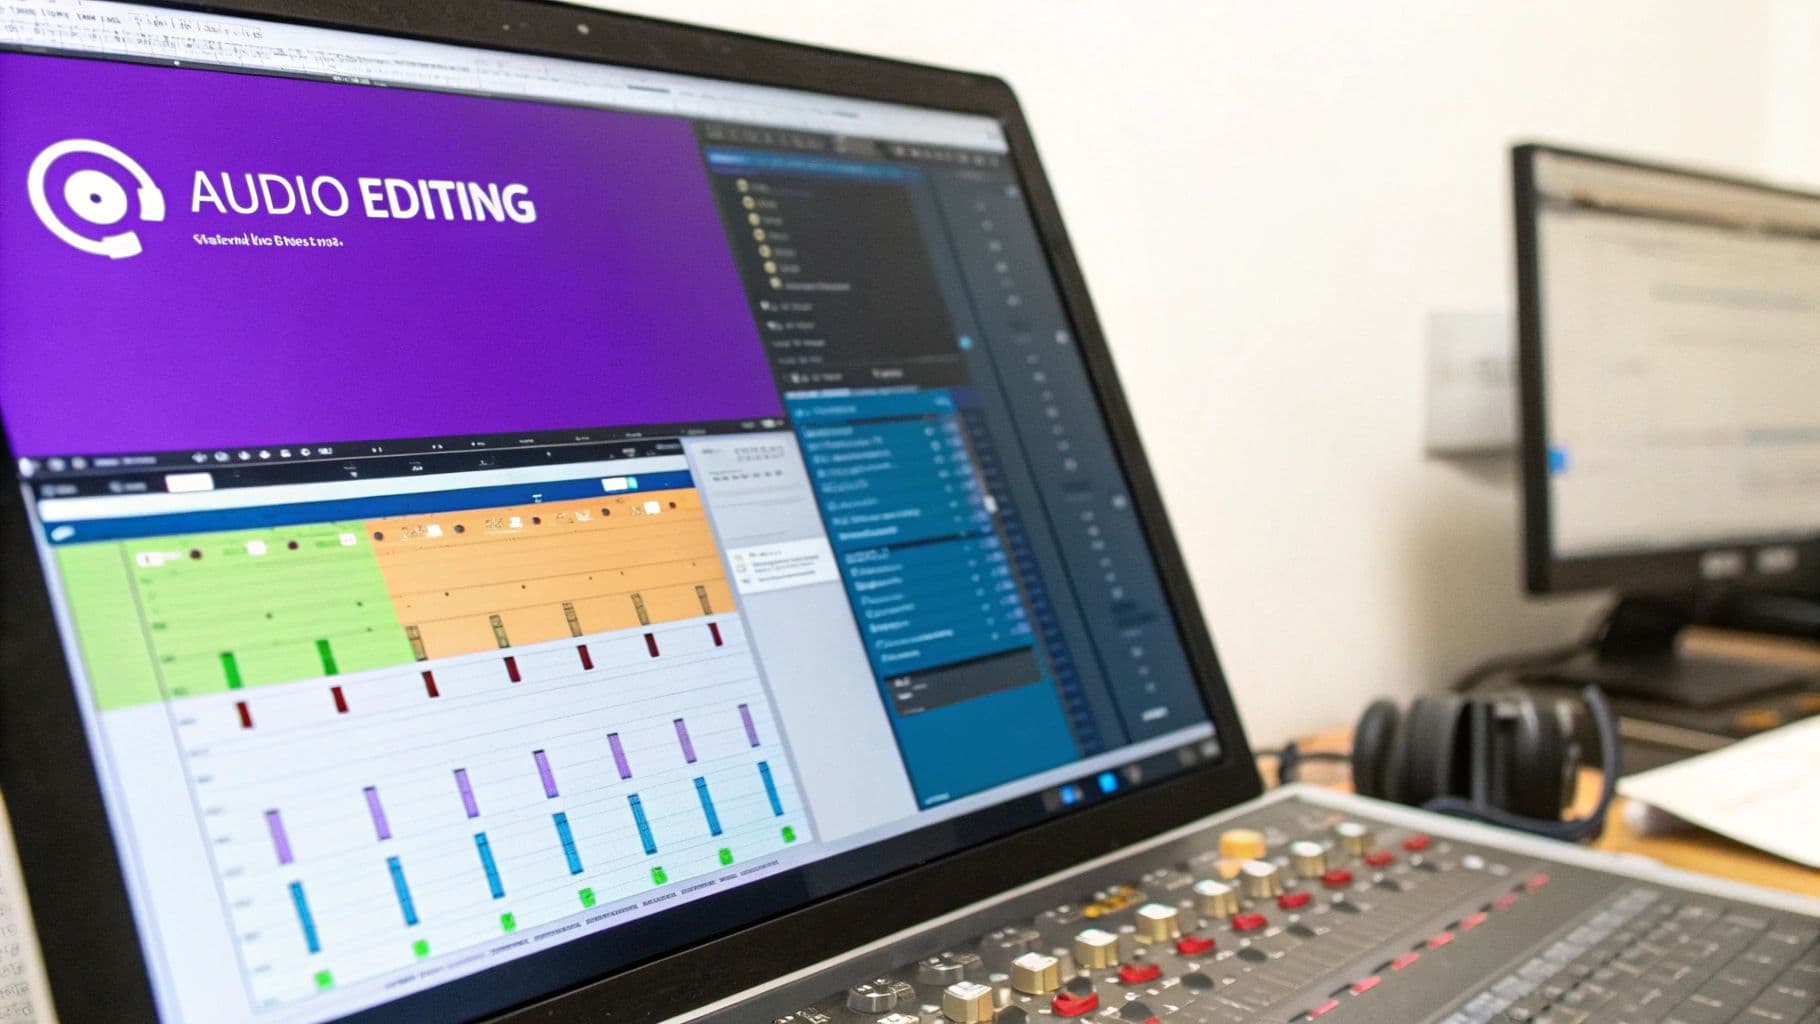
Here's a peek at what this looks like in a typical Digital Audio Workstation (DAW), which is the software you'd use to apply all these effects.
You can see the individual audio tracks laid out and the mixer panel where you’d dial in your EQ and compression settings to shape the sound.
Create Depth and Space with Effects
Finally, let's talk about creating a sense of space using effects like reverb and delay. These are the tools that can take a flat, "dry" recording and make it sound like it exists in a real room, adding a ton of dimension and emotion.
The key word here is subtlety. It's so easy to go overboard and drown your audio in reverb until it sounds like it's coming from the bottom of a well. You want just enough to give the sound a sense of place without being distracting.
For most voice work, starting with a "short" or "room" reverb preset is a safe bet. Just a tiny touch can add warmth and professionalism, helping to glue the entire mix together.
Modern tools have made this easier than ever. In fact, the AI audio processing software market was already valued at USD 3.8 billion in 2023 and is projected to skyrocket to USD 18 billion by 2033. This boom is driven by software that can automate complex edits and dramatically improve clarity. Many of the best video editing software packages now include surprisingly powerful audio mixing tools, so you might already have what you need.
Master Your Audio for a Professional Finish
You've done the hard work of recording, cleaning up, and mixing your audio. Now it’s time for the final victory lap: mastering. This isn't just a technical step; it's the art of taking a great mix and making it sound incredible everywhere.
Think of mastering as the final coat of paint and polish on a custom-built car. It ensures your audio is loud, clear, and consistent, whether someone’s listening on cheap earbuds, a laptop, or a beefy car stereo. This is what separates amateur audio from the pros.
Push Your Volume with a Limiter
One of the most obvious signs of an amateur mix is that it’s just… quiet. You have to crank the volume to hear it properly. We fix this with a powerful tool called a limiter. A limiter is essentially a compressor on steroids, setting an unbreakable volume ceiling for your track.
Its job is to boost the overall loudness to a competitive, commercial level without letting any peaks clip and create that nasty digital distortion. You’ll typically set a maximum output level—I usually go for somewhere between -0.5dB and -1.0dB to leave a little headroom for different playback systems—and then push the input gain. This makes the entire track feel fuller and more powerful, giving it that professional punch.
A Word of Caution: The goal here isn't just raw volume. You want it to sound effortlessly loud. Push the limiter too hard, and you'll squash all the dynamics and life out of your audio, creating a flat, fatiguing mess. A little goes a long way.
Add That Final Sparkle with EQ
Equalization (EQ) makes another appearance in mastering, but this time we're using a much gentler touch. Forget the surgical cuts you made during mixing. Here, we're talking broad, subtle brushstrokes across the entire mix.
Mastering EQ is all about those final tonal tweaks. Here are a few things I find myself doing all the time:
- Need more air? A gentle high-shelf boost around 10-12 kHz can add a beautiful, silky crispness.
- Feeling a bit thin? A tiny, wide boost in the low-end, maybe around 60-80 Hz, can add some serious weight and warmth.
- Is there a hint of boxiness? A slight dip somewhere between 300-400 Hz can clean up any lingering mud.
These adjustments should be almost impossible to notice. The rule of thumb is, if you can clearly hear the EQ working, you’ve probably gone too far. It’s all about adding that final 5% of polish that takes a track from good to great.
Widen Your Sound with Stereo Imaging
Here’s a fantastic trick that can make your audio sound huge. A stereo imaging or widening plugin lets you play with the perceived width of your sound, making it feel more immersive and three-dimensional.
For example, you can keep the low-end frequencies—like your bass and kick drum—locked in the center (mono) for maximum punch. Then, you can gently widen the higher frequencies to make synths, reverb trails, and cymbals feel like they’re wrapping around the listener's head. It’s an incredible way to add depth and make your audio feel bigger than the speakers it’s coming out of.
This technique is especially potent for visual projects. If you're pairing your incredible audio with a video, you might want to check out our guide on how to make a music video for tips on making your visuals just as expansive as your sound.
Exporting for the Real World
All this polishing is pointless if you trip at the finish line by exporting with the wrong settings. Your export format should be dictated entirely by where the audio is going to live.
Here’s a quick cheat sheet.
| File Format | Best For | Common Use Case |
|---|---|---|
| WAV (Uncompressed) | Archiving, sending to mastering engineers, burning to CD | This is your high-quality master file. Always save one. |
| MP3 (Compressed) | Universal compatibility, small file size for web/email | Sending previews, basic web players, personal listening. |
| AAC (Compressed) | Streaming, Apple ecosystem | Used by YouTube, Apple Music, and Apple Podcasts for high quality at smaller sizes. |
When you're uploading to major streaming platforms like Spotify, YouTube, or Apple Music, remember they use loudness normalization. They automatically adjust every track to a similar perceived volume, usually targeting around -14 LUFS. Exporting your master to this target in a high-quality format like a 320kbps MP3 or a 256kbps AAC is a safe bet. This ensures your audio sounds fantastic without being crushed or turned down by the platform's own algorithms.
Got Questions? We've Got Answers.
Alright, we've covered a lot of ground. It's totally normal for a few questions to be rattling around in your head. Getting into the nitty-gritty of audio always brings up some "but what about..." moments.
Let's dive into some of the most common questions I get asked. I'll give you the straight-up, no-fluff answers to help you on your quest for amazing sound.
What’s the One Thing I Really Need to Get Right?
If you only have the energy to focus on one thing, make it this: capture a clean recording at the source. Seriously. This is the foundation of your entire project. If you start with a cracked foundation, the whole house will be wobbly, no matter how much you try to patch it up later.
All the fancy software and post-production tricks in the world can't truly fix a recording that's full of background hum, nasty room echo, or that awful digital clipping. You'll get way more bang for your buck by simply getting your mic in the right spot, setting your levels properly, and maybe throwing a blanket over a hard surface. A great source recording makes everything that follows—noise reduction, mixing, mastering—a hundred times easier and more effective.
Can I Actually Do This Without Dropping a Ton of Cash on Software?
You bet. In fact, there's a good chance you already have the tools to make incredible-sounding audio. Free and budget-friendly Digital Audio Workstations (DAWs) like Audacity, GarageBand (for all you Mac users), and even Reaper are absolute powerhouses.
These programs are packed with perfectly good tools for EQ, compression, and noise reduction right out of the box. The real secret weapon isn't a premium plugin with a cool-looking interface; it's understanding the fundamentals and mastering the tools you already have.
My Two Cents: Get obsessed with learning the "how" and "why" behind what you're doing. Understanding what a compressor really does for your sound is infinitely more valuable than just owning the most expensive one. Once you nail the principles, you can pull off professional results with almost any piece of software.
What's the Real Difference Between Mixing and Mastering?
Ah, the classic question! It trips a lot of people up, but here's a simple way to think about it: mixing is like cooking each individual part of a meal, while mastering is arranging it all beautifully on the plate before you serve it.
- Mixing is all about the individual tracks. This is where you're adjusting the volume of the voice against the music, using an EQ to carve out space so they aren't fighting each other, and adding creative effects to make each element shine. It's all about making sure everything inside the project sounds great together.
- Mastering happens after the mix is done. You take that final stereo file and treat it as one cohesive thing. The goal here is to add the final polish—tweaking the overall tone with a gentle EQ, making it commercially loud, and ensuring it sounds amazing everywhere, from a cheap phone speaker to a booming car stereo.
How Loud Is "Loud Enough" These Days?
The rules have changed a bit. It's not just about avoiding the red "peak" light anymore. The new king is LUFS (Loudness Units Full Scale), which measures how loud something actually sounds to the human ear. This is the metric that platforms like Spotify and YouTube use to keep the volume consistent from one video to the next.
Most big platforms will automatically adjust audio to their target, which is usually around -14 LUFS to -16 LUFS. If you make your audio louder than that, they'll just turn it down, and that process can sometimes crush the dynamics you worked so hard to perfect.
A great, safe target for most online content is -16 LUFS. If you aim for that, your audio will sound professional and hold up no matter where it's played.
Tired of the tedious parts of making videos? MyKaraoke Video uses slick AI to automatically sync lyrics to your music, helping you create awesome karaoke and lyric videos in just minutes. Turn your amazing audio into something people can watch by checking out MyKaraoke.Video today.